Service负载均衡
通过以前的学习,我们已经能够通过Deployment来创建一组Pod来提供具有高可用性的服务。
虽然每个Pod都会分配一个单独的Pod IP,然而却存在如下两个问题:
- Pod IP仅仅是集群内可见的虚拟IP,外部无法访问。
- Pod IP会随着Pod的销毁而消失,当ReplicaSet对Pod进行动态伸缩时,Pod IP可能随时随地都会变化,这样对于我们访问这个服务带来了难度。
- 因此需要引入service对pod进行负载均衡代理访问
SVC之ClusterIP
service是一组pod的服务抽象,相当于一组pod的LB,负责将请求分发给对应的pod。
service会为这个LB提供一个IP,一般称为cluster IP 。
使用Service对象,通过selector进行标签选择,找到对应的Pod:
#service-eladmin-api.yaml
apiVersion: v1
kind: Service
metadata:
  name: eladmin-api
  namespace: yuchao
spec:
  ports:
  - port: 8000
    protocol: TCP
    targetPort: 8000
  selector:
    app: eladmin-api
  type: ClusterIP
创建、检查svc
[root@k8s-master ~/k8s-all]#kubectl create -f svc-eladmin.yaml
service/eladmin-api created
[root@k8s-master ~/k8s-all]#kubectl -n yuchao get svc -owide
NAME          TYPE        CLUSTER-IP       EXTERNAL-IP   PORT(S)    AGE   SELECTOR
eladmin-api   ClusterIP   10.110.57.234    <none>        8000/TCP   5s    app=eladmin-api
mysql         ClusterIP   10.106.247.171   <none>        3306/TCP   21h   app=mysql
redis         ClusterIP   10.105.65.167    <none>        6379/TCP   21h   app=redis
[root@k8s-master ~/k8s-all]#kubectl -n yuchao describe svc eladmin-api
Name:              eladmin-api
Namespace:         yuchao
Labels:            <none>
Annotations:       <none>
Selector:          app=eladmin-api
Type:              ClusterIP
IP Family Policy:  SingleStack
IP Families:       IPv4
IP:                10.110.57.234
IPs:               10.110.57.234
Port:              <unset>  8000/TCP
TargetPort:        8000/TCP
Endpoints:         10.244.0.19:8000,10.244.0.20:8000,10.244.1.14:8000 + 1 more...
Session Affinity:  None
Events:            <none>
[root@k8s-master ~/k8s-all]#
label选择器
svc怎么找到的pod,标签选择器
[root@k8s-master ~/k8s-all]#kubectl -n yuchao get po -l app=eladmin-api
NAME                          READY   STATUS    RESTARTS   AGE
eladmin-api-9446bcc45-4tvtx   1/1     Running   0          15m
eladmin-api-9446bcc45-h9bkx   1/1     Running   0          15m
eladmin-api-9446bcc45-pkpjr   1/1     Running   0          15m
eladmin-api-9446bcc45-vhc8v   1/1     Running   0          15m
查询endpoints
[root@k8s-master ~/k8s-all]#kubectl -n yuchao describe endpoints eladmin-api
Name:         eladmin-api
Namespace:    yuchao
Labels:       <none>
Annotations:  endpoints.kubernetes.io/last-change-trigger-time: 2023-03-21T13:41:05Z
Subsets:
  Addresses:          10.244.0.19,10.244.0.20,10.244.1.14,10.244.2.29
  NotReadyAddresses:  <none>
  Ports:
    Name     Port  Protocol
    ----     ----  --------
    <unset>  8000  TCP

Events:  <none>
查看Endpoints记录的pods详细信息
[root@k8s-master ~/k8s-all]#kubectl -n yuchao get endpoints eladmin-api -oyaml
这些底层信息,很稳定,为了理解流程
create service
↓
endpoints
↓
pod
扩缩容pod
查看svc、Endpoints、pod的关系变化
[root@k8s-master ~/k8s-all]#vim deployment-eladmin.yaml
[root@k8s-master ~/k8s-all]#kubectl apply -f deployment-eladmin.yaml
deployment.apps/eladmin-api configured


# ep
[root@k8s-master ~/k8s-all]#kubectl -n yuchao get endpoints eladmin-api  -oyaml
apiVersion: v1
kind: Endpoints
metadata:
  creationTimestamp: "2023-03-21T13:41:05Z"
  name: eladmin-api
  namespace: yuchao
  resourceVersion: "593257"
  uid: 57d55c44-fee6-45cf-9fc0-ad2451605441
subsets:
- addresses:
  - ip: 10.244.1.14
    nodeName: k8s-slave2
    targetRef:
      kind: Pod
      name: eladmin-api-9446bcc45-pkpjr
      namespace: yuchao
      uid: cd8ee289-62f0-46eb-92eb-6bc9591010b1
  ports:
  - port: 8000
    protocol: TCP

# svc
[root@k8s-master ~/k8s-all]#kubectl -n yuchao get svc eladmin-api -oyaml
apiVersion: v1
kind: Service
metadata:
  creationTimestamp: "2023-03-21T13:41:05Z"
  name: eladmin-api
  namespace: yuchao
  resourceVersion: "592384"
  uid: 41a755f6-7bc6-4204-99eb-2160d3078958
spec:
  clusterIP: 10.110.57.234
  clusterIPs:
  - 10.110.57.234
  internalTrafficPolicy: Cluster
  ipFamilies:
  - IPv4
  ipFamilyPolicy: SingleStack
  ports:
  - port: 8000
    protocol: TCP
    targetPort: 8000
  selector:
    app: eladmin-api
  sessionAffinity: None
  type: ClusterIP
status:
  loadBalancer: {}


# pod
[root@k8s-master ~/k8s-all]#kubectl -n yuchao get po
NAME                          READY   STATUS    RESTARTS   AGE
eladmin-api-9446bcc45-pkpjr   1/1     Running   0          23m
mysql-7c7cf8495f-5w5bk        1/1     Running   0          21h
redis-7957d49f44-cxj8z        1/1     Running   0          20h


# deployment
[root@k8s-master ~/k8s-all]#kubectl -n yuchao get deployments.apps eladmin-api
NAME          READY   UP-TO-DATE   AVAILABLE   AGE
eladmin-api   1/1     1            1           23m


# rs

[root@k8s-master ~/k8s-all]#kubectl -n yuchao get rs eladmin-api-9446bcc45
NAME                    DESIRED   CURRENT   READY   AGE
eladmin-api-9446bcc45   1         1         1       24m
Service与Pod如何关联
service对象创建的同时,会创建同名的endpoints对象,若服务设置了readinessProbe, 当readinessProbe检测失败时,endpoints列表中会剔除掉对应的pod_ip,这样流量就不会分发到健康检测失败的Pod中
访问clusterIP
[root@k8s-master ~/k8s-all]#curl 10.110.57.234:8000/who
"Who are you ? I am teacher yuchao and my website is www.yuchaoit.cn ! "
为什么访问clusterIP可以访问到pod
- clusterIP只能在k8s集群内访问,外部是无法访问的。
- 很明显k8s内部得有一个机制,能将流量转发给pod
- 例如docker的端口映射关系
[root@k8s-master ~/k8s-all]#kubectl -n yuchao get svc -owide
NAME          TYPE        CLUSTER-IP       EXTERNAL-IP   PORT(S)    AGE   SELECTOR
eladmin-api   ClusterIP   10.110.57.234    <none>        8000/TCP   12m   app=eladmin-api
mysql         ClusterIP   10.106.247.171   <none>        3306/TCP   21h   app=mysql
redis         ClusterIP   10.105.65.167    <none>        6379/TCP   21h   app=redis


[root@k8s-master ~/k8s-all]#curl 10.110.57.234:8000/who
"Who are you ? I am teacher yuchao and my website is www.yuchaoit.cn ! "

[root@k8s-master ~/k8s-all]#kubectl -n yuchao get po -owide
NAME                          READY   STATUS    RESTARTS   AGE   IP            NODE         NOMINATED NODE   READINESS GATES
eladmin-api-9446bcc45-pkpjr   1/1     Running   0          27m   10.244.1.14   k8s-slave2   <none>           <none>
mysql-7c7cf8495f-5w5bk        1/1     Running   0          21h   10.244.0.14   k8s-master   <none>           <none>
redis-7957d49f44-cxj8z        1/1     Running   0          20h   10.244.1.10   k8s-slave2   <none>           <none>
[root@k8s-master ~/k8s-all]#
访问关系
10.110.57.234:8000 > 10.244.1.14:8000

# 这种访问关系,也是因为你创建service的规则
spec:
  ports:
  - port: 8000
    protocol: TCP
    targetPort: 8000
接下来,探究service的网络代理原理
kube-proxy组件
访问SVC的VIP,是内部有kube-proxy进行流量转发给pod。
运行在每个节点上,监听 API Server 中服务对象的变化,再通过创建流量路由规则来实现网络的转发。
查看kube-proxy进程、以pod形式运行在每个节点上的进程。
[root@k8s-master ~/k8s-all]#kubectl -n kube-system get po -l k8s-app=kube-proxy
NAME               READY   STATUS    RESTARTS      AGE
kube-proxy-6qbx5   1/1     Running   1 (25h ago)   11d
kube-proxy-7m2cj   1/1     Running   1 (25h ago)   11d
kube-proxy-glzmw   1/1     Running   1 (25h ago)   11d


[root@k8s-master ~/k8s-all]#nerdctl -n k8s.io ps |grep kube-proxy
1af7088b4a1e    registry.aliyuncs.com/google_containers/kube-proxy:v1.24.4                 "/usr/local/bin/kube…"    26 hours ago    Up                 k8s://kube-system/kube-proxy-6qbx5/kube-proxy
bd6e9034be06    registry.aliyuncs.com/google_containers/pause:3.6                          "/pause"                  26 hours ago    Up                 k8s://kube-system/kube-proxy-6qbx5

# 注意[y]表示匹配带有y这个字符的结果,因此会忽略grep
[root@k8s-master ~/k8s-all]#ps -ef|grep kube-prox[y]
root       9531   9282  0 Mar20 ?        00:00:09 /usr/local/bin/kube-proxy --config=/var/lib/kube-proxy/config.conf --hostname-override=k8s-master


# 如上容器进程,是k8s每一个节点都可以查到的。
三种模式

- User space, 让 Kube-Proxy 在用户空间监听一个端口,所有的 Service 都转发到这个端口,然后 Kube-Proxy 在内部应用层对其进行转发 , 所有报文都走一遍用户态,性能不高,k8s v1.2版本后废弃。
- Iptables, 当前默认模式,完全由 IPtables 来实现, 通过各个node节点上的iptables规则来实现service的负载均衡,但是随着service数量的增大,iptables模式由于线性查找匹配、全量更新等特点,其性能会显著下降。
- IPVS, 与iptables同样基于Netfilter,但是采用的hash表,因此当service数量达到一定规模时,hash查表的速度优势就会显现出来,从而提高service的服务性能。 k8s 1.8版本开始引入,1.11版本开始稳定,需要开启宿主机的ipvs模块。
[root@k8s-master ~/k8s-all]#kubectl -n kube-system logs -f kube-proxy-glzmw
I0320 12:03:56.869093       1 node.go:163] Successfully retrieved node IP: 10.0.0.82
I0320 12:03:56.869171       1 server_others.go:138] "Detected node IP" address="10.0.0.82"
I0320 12:03:56.869200       1 server_others.go:578] "Unknown proxy mode, assuming iptables proxy" proxyMode=""
I0320 12:03:56.952125       1 server_others.go:206] "Using iptables Proxier"
I0320 12:03:56.952157       1 server_others.go:213] "kube-proxy running in dual-stack mode" ipFamily=IPv4
I0320 12:03:56.952163       1 server_others.go:214] "Creating dualStackProxier for iptables"
可知默认用的是iptables模式
记录iptables规则与svc关系
已知,创建svc后,会生成iptables规则进行流量转发,因此可以对应svc与iptables语句
# 查询出svc
[root@k8s-master ~/k8s-all]#kubectl -n yuchao get svc  eladmin-api
NAME          TYPE        CLUSTER-IP      EXTERNAL-IP   PORT(S)    AGE
eladmin-api   ClusterIP   10.110.57.234   <none>        8000/TCP   33m

# 保存iptables规则 且过滤出对应的svc-ip
[root@k8s-master ~/k8s-all]#iptables-save |grep 10.110.57.234
-A KUBE-SERVICES -d 10.110.57.234/32 -p tcp -m comment --comment "yuchao/eladmin-api cluster IP" -m tcp --dport 8000 -j KUBE-SVC-IOJMSWRHLGYQTAUL
-A KUBE-SVC-IOJMSWRHLGYQTAUL ! -s 10.244.0.0/16 -d 10.110.57.234/32 -p tcp -m comment --comment "yuchao/eladmin-api cluster IP" -m tcp --dport 8000 -j KUBE-MARK-MASQ
详细iptables与svc原理图
命令流程
[root@k8s-master ~/k8s-all]#kubectl -n yuchao get svc eladmin-api
NAME          TYPE        CLUSTER-IP      EXTERNAL-IP   PORT(S)    AGE
eladmin-api   ClusterIP   10.110.57.234   <none>        8000/TCP   79m

[root@k8s-master ~/k8s-all]#iptables-save |grep 10.110.57.234
-A KUBE-SERVICES -d 10.110.57.234/32 -p tcp -m comment --comment "yuchao/eladmin-api cluster IP" -m tcp --dport 8000 -j KUBE-SVC-IOJMSWRHLGYQTAUL
-A KUBE-SVC-IOJMSWRHLGYQTAUL ! -s 10.244.0.0/16 -d 10.110.57.234/32 -p tcp -m comment --comment "yuchao/eladmin-api cluster IP" -m tcp --dport 8000 -j KUBE-MARK-MASQ


[root@k8s-master ~/k8s-all]#iptables-save |grep -v MASQ |grep KUBE-SVC-IOJMSWRHLGYQTAUL
:KUBE-SVC-IOJMSWRHLGYQTAUL - [0:0]
-A KUBE-SERVICES -d 10.110.57.234/32 -p tcp -m comment --comment "yuchao/eladmin-api cluster IP" -m tcp --dport 8000 -j KUBE-SVC-IOJMSWRHLGYQTAUL
-A KUBE-SVC-IOJMSWRHLGYQTAUL -m comment --comment "yuchao/eladmin-api -> 10.244.0.21:8000" -m statistic --mode random --probability 0.25000000000 -j KUBE-SEP-OFXAHUM4KGMP5HY4
-A KUBE-SVC-IOJMSWRHLGYQTAUL -m comment --comment "yuchao/eladmin-api -> 10.244.1.14:8000" -m statistic --mode random --probability 0.33333333349 -j KUBE-SEP-X5ABSNTMLLOXZSEG
-A KUBE-SVC-IOJMSWRHLGYQTAUL -m comment --comment "yuchao/eladmin-api -> 10.244.2.30:8000" -m statistic --mode random --probability 0.50000000000 -j KUBE-SEP-XCCOGI7776AYMXUQ
-A KUBE-SVC-IOJMSWRHLGYQTAUL -m comment --comment "yuchao/eladmin-api -> 10.244.2.31:8000" -j KUBE-SEP-Y2WND7LWQYPCNWWG
[root@k8s-master ~/k8s-all]#


[root@k8s-master ~/k8s-all]#iptables-save |grep -v MASQ |grep KUBE-SEP-XCCOGI7776AYMXUQ
:KUBE-SEP-XCCOGI7776AYMXUQ - [0:0]
-A KUBE-SEP-XCCOGI7776AYMXUQ -p tcp -m comment --comment "yuchao/eladmin-api" -m tcp -j DNAT --to-destination 10.244.2.30:8000
-A KUBE-SVC-IOJMSWRHLGYQTAUL -m comment --comment "yuchao/eladmin-api -> 10.244.2.30:8000" -m statistic --mode random --probability 0.50000000000 -j KUBE-SEP-XCCOGI7776AYMXUQ
小结
所以本质上,service的流量转发,就是DNAT的iptables规则,修改目标地址的转发。
客户端
↓
svc
↓
pod
面试题
k8s的Service Cluster-IP能不能ping通
答案:ping不通

[root@k8s-master ~/k8s-all]#ping 10.110.57.234
PING 10.110.57.234 (10.110.57.234) 56(84) bytes of data.
From 61.51.54.90 icmp_seq=4 Destination Host Unreachable

# 答案分析
[root@k8s-master ~/k8s-all]#iptables-save |grep 10.110.57.234
-A KUBE-SERVICES -d 10.110.57.234/32 -p tcp -m comment --comment "yuchao/eladmin-api cluster IP" -m tcp --dport 8000 -j KUBE-SVC-IOJMSWRHLGYQTAUL
-A KUBE-SVC-IOJMSWRHLGYQTAUL ! -s 10.244.0.0/16 -d 10.110.57.234/32 -p tcp -m comment --comment "yuchao/eladmin-api cluster IP" -m tcp --dport 8000 -j KUBE-MARK-MASQ

# 很明显,iptables只处理你给svc发来的tcp数据包,进行dnat转发
# ping是icmp协议数据包,也没有这种iptables规则,所以ping不通。
# 并且这个svc是虚拟IP,也没有真实网卡,没人收你的请求
# 想ping通
1.有网卡绑定IP,且允许回应客户端请求,回响数据包
IPVS模式
IPVS, 与iptables同样基于Netfilter,但是采用的hash表,因此当service数量达到一定规模时,hash查表的速度优势就会显现出来,从而提高service的服务性能。
k8s 1.8版本开始引入,1.11版本开始稳定,需要开启宿主机的ipvs模块。
超大规模上ipvs(得了解,怎么修改,怎么用)
iptables上中小规模(几百个svc就别操心了,iptables杠杠的)
修改kube-proxy为ipvs模式
# 内核开启ipvs模块,集群各节点都执行
cat > /etc/sysconfig/modules/ipvs.modules <<EOF
#!/bin/bash
ipvs_modules="ip_vs ip_vs_lc ip_vs_wlc ip_vs_rr ip_vs_wrr ip_vs_lblc ip_vs_lblcr ip_vs_dh ip_vs_sh ip_vs_nq ip_vs_sed ip_vs_ftp nf_conntrack_ipv4"
for kernel_module in \${ipvs_modules}; do
    /sbin/modinfo -F filename \${kernel_module} > /dev/null 2>&1
    if [ $? -eq 0 ]; then
        /sbin/modprobe \${kernel_module}
    fi
done
EOF

# 执行脚本与检查
chmod 755 /etc/sysconfig/modules/ipvs.modules && bash /etc/sysconfig/modules/ipvs.modules && lsmod | grep ip_vs
安装ipvsadm工具
[root@k8s-master ~/k8s-all]#yum install ipset ipvsadm -y
修改kube-proxy配置文件
该进程会监听service、维护iptables规则(更新svc、自动iptables更新)
[root@k8s-master ~/k8s-all]#kubectl -n kube-system edit cm kube-proxy
configmap/kube-proxy edited


     45     kind: KubeProxyConfiguration
     46     metricsBindAddress: ""
     47     mode: ""
重建kube-proxy,即可自动加载新的configmap配置,使用ipvs类型
kubectl -n kube-system get po |grep kube-proxy|awk '{print $1}'|xargs kubectl -n kube-system delete po

# 自动生成新pod
[root@k8s-master ~/k8s-all]#
[root@k8s-master ~/k8s-all]#kubectl -n kube-system get po -l k8s-app=kube-proxy
NAME               READY   STATUS    RESTARTS   AGE
kube-proxy-5vvgp   1/1     Running   0          39s
kube-proxy-lfvwt   1/1     Running   0          39s
kube-proxy-np8rb   1/1     Running   0          38s

# 这是因为有daemonset存在,该控制器确保部署在每个节点上,且只有一个pod副本
# 后面会由这种特性的应用,使用daemonset去讲解
[root@k8s-master ~/k8s-all]#kubectl -n kube-system get daemonsets.apps
NAME         DESIRED   CURRENT   READY   UP-TO-DATE   AVAILABLE   NODE SELECTOR            AGE
kube-proxy   3         3         3       3            3           kubernetes.io/os=linux   12d
查看日志,是否使用ipvs
[root@k8s-master ~/k8s-all]#kubectl -n kube-system logs -f kube-proxy-5vvgp
I0321 17:02:50.135137       1 node.go:163] Successfully retrieved node IP: 10.0.0.80
I0321 17:02:50.135250       1 server_others.go:138] "Detected node IP" address="10.0.0.80"
I0321 17:02:50.147696       1 server_others.go:269] "Using ipvs Proxier"
I0321 17:02:50.147716       1 server_others.go:271] "Creating dualStackProxier for ipvs"
I0321 17:02:50.147758       1 server_others.go:501] "Detect-local-mode set to ClusterCIDR, but no IPv6 cluster CIDR defined, , defaulting to no-op detect-local for IPv6"
E0321 17:02:50.147843       1 proxier.go:391] "Can't set sysctl, kernel version doesn't satisfy minimum version requirements" sysctl="net/ipv4/vs/conn_reuse_mode" minimumKernelVersion="4.1"
I0321 17:02:50.147882       1 proxier.go:450] "IPVS scheduler not specified, use rr by default"
E0321 17:02:50.147958       1 proxier.go:391] "Can't set sysctl, kernel version doesn't satisfy minimum version requirements" sysctl="net/ipv4/vs/conn_reuse_mode" minimumKernelVersion="4.1"
I0321 17:02:50.147978       1 proxier.go:450] "IPVS scheduler not specified, use rr by default"
I0321 17:02:50.148028       1 ipset.go:113] "Ipset name truncated" ipSetName="KUBE-6-LOAD-BALANCER-SOURCE-CIDR" truncatedName="KUBE-6-LOAD-BALANCER-SOURCE-CID"
I0321 17:02:50.148042       1 ipset.go:113] "Ipset name truncated" ipSetName="KUBE-6-NODE-PORT-LOCAL-SCTP-HASH" truncatedName="KUBE-6-NODE-PORT-LOCAL-SCTP-HAS"
I0321 17:02:50.148317       1 server.go:661] "Version info" version="v1.24.4"
I0321 17:02:50.148331       1 server.go:663] "Golang settings" GOGC="" GOMAXPROCS="" GOTRACEBACK=""
I0321 17:02:50.151619       1 conntrack.go:52] "Setting nf_conntrack_max" nf_conntrack_max=131072
I0321 17:02:50.151930       1 config.go:317] "Starting service config controller"
I0321 17:02:50.151952       1 config.go:226] "Starting endpoint slice config controller"
I0321 17:02:50.151972       1 shared_informer.go:255] Waiting for caches to sync for endpoint slice config
I0321 17:02:50.151972       1 shared_informer.go:255] Waiting for caches to sync for service config
I0321 17:02:50.152021       1 config.go:444] "Starting node config controller"
I0321 17:02:50.152025       1 shared_informer.go:255] Waiting for caches to sync for node config
I0321 17:02:50.252629       1 shared_informer.go:262] Caches are synced for endpoint slice config
I0321 17:02:50.252683       1 shared_informer.go:262] Caches are synced for service config
I0321 17:02:50.252709       1 shared_informer.go:262] Caches are synced for node config
可见已经更新到了ipvs模式,并且同步了缓存数据,意思是还可以使用之前的service规则等。
[root@k8s-master ~/k8s-all]#ping  -c 5 10.110.57.234
PING 10.110.57.234 (10.110.57.234) 56(84) bytes of data.
64 bytes from 10.110.57.234: icmp_seq=1 ttl=64 time=0.108 ms
64 bytes from 10.110.57.234: icmp_seq=2 ttl=64 time=0.042 ms
64 bytes from 10.110.57.234: icmp_seq=3 ttl=64 time=0.038 ms
64 bytes from 10.110.57.234: icmp_seq=4 ttl=64 time=0.038 ms
64 bytes from 10.110.57.234: icmp_seq=5 ttl=64 time=0.037 ms

--- 10.110.57.234 ping statistics ---
5 packets transmitted, 5 received, 0% packet loss, time 4000ms
rtt min/avg/max/mdev = 0.037/0.052/0.108/0.028 ms
[root@k8s-master ~/k8s-all]#
为什么能ping通了?
# 管理ipvs,使用ipvsadm命令
[root@k8s-master ~/k8s-all]#ipvsadm -ln

[root@k8s-master ~/k8s-all]#ipvsadm -ln |grep 10.110.57.234:8000 -A 5
TCP  10.110.57.234:8000 rr
  -> 10.244.0.21:8000             Masq    1      0          0
  -> 10.244.1.14:8000             Masq    1      0          0
  -> 10.244.2.30:8000             Masq    1      0          0
  -> 10.244.2.31:8000             Masq    1      0          0
TCP  10.244.0.0:31685 rr

# 一样,可以看到,是svc的流量,会转发给4个pod
# 改完ipvs后,可以不用修改回去了,也是高性能模式。

# 因为该ip绑定了kube-ipvs0网卡了
# 该网卡kube-ipvs0 会吧所有的svc资源,创建的VIP,绑定到该网卡
# 此时ping SVC-IP,会有网卡回应请求
# 而不同于iptables模式下,svc没有网卡,也没有规则转发流量,因此ping不通

[root@k8s-master ~/k8s-all]#ip addr show kube-ipvs0
24: kube-ipvs0: <BROADCAST,NOARP> mtu 1500 qdisc noop state DOWN group default
    link/ether 62:05:3a:72:42:35 brd ff:ff:ff:ff:ff:ff
    inet 10.98.2.114/32 scope global kube-ipvs0
       valid_lft forever preferred_lft forever
    inet 10.104.219.151/32 scope global kube-ipvs0
       valid_lft forever preferred_lft forever
    inet 10.105.65.167/32 scope global kube-ipvs0
       valid_lft forever preferred_lft forever
    inet 10.96.0.10/32 scope global kube-ipvs0
       valid_lft forever preferred_lft forever
    inet 10.96.0.1/32 scope global kube-ipvs0
       valid_lft forever preferred_lft forever
    inet 10.106.247.171/32 scope global kube-ipvs0
       valid_lft forever preferred_lft forever
    inet 10.110.57.234/32 scope global kube-ipvs0
       valid_lft forever preferred_lft forever
面试坑
面试官:k8s的service能不能ping通?
你得回答如下两种情况,否则是不合格的
- iptables情况
- ipvs情况
服务发现/服务注册
service的确是好用,但是目前我们还是在用IP地址在操作,如果同一份svc资源的yaml,给到了测试、开发、生产环境执行,我们拿到的svc-ip都是不一样的,那肯定是很麻烦,如果固定不变呢?用域名、名称解析即可。
在k8s集群中,组件之间可以通过定义的Service名称实现通信。
同理就是注册中心,consul、eureka、nacos等产品都是方便对服务进行域名解析。
默认我们可以用
[root@k8s-master ~]#kubectl -n yuchao get svc
NAME TYPE CLUSTER-IP EXTERNAL-IP PORT(S) AGE
eladmin-api ClusterIP 10.110.57.234 <none> 8000/TCP 23h
mysql ClusterIP 10.106.247.171 <none> 3306/TCP 44h
redis ClusterIP 10.105.65.167 <none> 6379/TCP 44h
[root@k8s-master ~]#
[root@k8s-master ~]#curl 10.106.247.171:3306
5.7.36_-s(@lLÿÿXp,0:X])a
-Dmysql_native_password!ÿ#08S01Got packets out of order[root@k8s-master ~]#
什么是微服务/注册/调用
传统的微服务开发,需要引入代码,代码引入三方的功能,如nacos等;
而k8s无须任何侵入性,即可解决服务发现问题;

k8s怎么做的服务发现?
svc的服务注册
就是用的service组件,如下就是服务注册,当pod启动后,也就是提供服务的多个后端副本;
我们通过创建service,走label选择器,代理多个pod后端,且自动记录后端pod的IP信息;
svc的endpoints就是服务注册功能,这是k8s平台本身功能,无须业务做任何改造;
服务注册、服务注册时微服务下必须要解决的问题,k8s轻松的解决了这个问题;
[root@k8s-master ~]#kubectl -n yuchao get svc -owide
^[[ANAME          TYPE        CLUSTER-IP       EXTERNAL-IP   PORT(S)    AGE   SELECTOR
eladmin-api   ClusterIP   10.110.57.234    <none>        8000/TCP   23h   app=eladmin-api
mysql         ClusterIP   10.106.247.171   <none>        3306/TCP   44h   app=mysql
redis         ClusterIP   10.105.65.167    <none>        6379/TCP   45h   app=redis
[root@k8s-master ~]#kubectl -n yuchao describe svc eladmin-api
Name:              eladmin-api
Namespace:         yuchao
Labels:            <none>
Annotations:       <none>
Selector:          app=eladmin-api
Type:              ClusterIP
IP Family Policy:  SingleStack
IP Families:       IPv4
IP:                10.110.57.234
IPs:               10.110.57.234
Port:              <unset>  8000/TCP
TargetPort:        8000/TCP
Endpoints:         10.244.0.21:8000,10.244.1.14:8000,10.244.2.30:8000 + 1 more...
Session Affinity:  None
Events:            <none>
[root@k8s-master ~]#
svc的服务发现
先看结果
[root@k8s-master ~]#kubectl -n yuchao exec -it eladmin-api-9446bcc45-jrpk4 -- bash
root@eladmin-api-9446bcc45-jrpk4:/opt/eladmin#
root@eladmin-api-9446bcc45-jrpk4:/opt/eladmin# curl mysql:3306
5.7.36`
~{~?ÿÿ0
W%'k<eysql_native_password!ÿ#08S01Got packets out of orderroot@eladmin-api-9446bcc45-jrpk4:/opt/eladmin#
root@eladmin-api-9446bcc45-jrpk4:/opt/eladmin#
root@eladmin-api-9446bcc45-jrpk4:/opt/eladmin# curl redis:6379
-ERR wrong number of arguments for 'get' command
-ERR unknown command 'User-Agent:'
root@eladmin-api-9446bcc45-jrpk4:/opt/eladmin#
root@eladmin-api-9446bcc45-jrpk4:/opt/eladmin#
root@eladmin-api-9446bcc45-jrpk4:/opt/eladmin# curl eladmin-api:8000/who
"Who are you ? I am teacher yuchao and my website is www.yuchaoit.cn ! "
上面的结果,很明显,在容器内,我们为什么可以通过这些名字,去访问到对应的应用??
这就是服务发现功能,k8s内置了coredns域名服务器;
coredns组件
1.先看看容器内和域名有关的配置文件
root@eladmin-api-9446bcc45-jrpk4:/opt/eladmin# cat /etc/resolv.conf
search yuchao.svc.cluster.local svc.cluster.local cluster.local
nameserver 10.96.0.10
options ndots:5


2.这个地址是谁? 10.96.0.10 ,一会在看

3.查看完整的FQDN,关于dns的搜索域、域名后缀,搜索上述的几个域
root@eladmin-api-9446bcc45-jrpk4:/opt/eladmin#
root@eladmin-api-9446bcc45-jrpk4:/opt/eladmin# curl eladmin-api.yuchao.svc.cluster.local:8000/who
"Who are you ? I am teacher yuchao and my website is www.yuchaoit.cn ! "root@eladmin-api-9446bcc45-jrpk4:/opt/eladmin#
root@eladmin-api-9446bcc45-jrpk4:/opt/eladmin#
root@eladmin-api-9446bcc45-jrpk4:/opt/eladmin# curl eladmin-api.svc.cluster.local:8000/who
curl: (6) Could not resolve host: eladmin-api.svc.cluster.local
root@eladmin-api-9446bcc45-jrpk4:/opt/eladmin# curl eladmin-api.cluster.local:8000/who
curl: (6) Could not resolve host: eladmin-api.cluster.local
root@eladmin-api-9446bcc45-jrpk4:/opt/eladmin#
root@eladmin-api-9446bcc45-jrpk4:/opt/eladmin# curl eladmin-api:8000/who
"Who are you ? I am teacher yuchao and my website is www.yuchaoit.cn ! "


可以看出,我们的eladmin-api是属于具体namespace下的,搜索域也得加上,否则找不到该域名记录


4.查询k8s所有的service看看
[root@k8s-master ~]#kubectl get svc -A
NAMESPACE              NAME                        TYPE        CLUSTER-IP       EXTERNAL-IP   PORT(S)                  AGE
default                kubernetes                  ClusterIP   10.96.0.1        <none>        443/TCP                  12d
kube-system            kube-dns                    ClusterIP   10.96.0.10       <none>        53/UDP,53/TCP,9153/TCP   12d
kubernetes-dashboard   dashboard-metrics-scraper   ClusterIP   10.98.2.114      <none>        8000/TCP                 12d
kubernetes-dashboard   kubernetes-dashboard        NodePort    10.104.219.151   <none>        443:31685/TCP            12d
yuchao                 eladmin-api                 ClusterIP   10.110.57.234    <none>        8000/TCP                 24h
yuchao                 mysql                       ClusterIP   10.106.247.171   <none>        3306/TCP                 45h
yuchao                 redis                       ClusterIP   10.105.65.167    <none>        6379/TCP                 45h
[root@k8s-master ~]#
coredns是什么
CoreDNS是一个Go语言实现的链式插件DNS服务端,是CNCF成员,是一个高性能、易扩展的DNS服务端。
10.96.0.10从哪来的?它就是 coredns的service地址
查看coredns创建的service,就是它作为了域名服务器
[root@k8s-master ~]#kubectl get svc -A |grep 10.96.0.10
kube-system            kube-dns                    ClusterIP   10.96.0.10       <none>        53/UDP,53/TCP,9153/TCP   12d

# 根据service找它的pod,describe
[root@k8s-master ~]#kubectl -n kube-system describe svc kube-dns
Name:              kube-dns
Namespace:         kube-system
Labels:            k8s-app=kube-dns
                   kubernetes.io/cluster-service=true
                   kubernetes.io/name=CoreDNS
Annotations:       prometheus.io/port: 9153
                   prometheus.io/scrape: true
Selector:          k8s-app=kube-dns
Type:              ClusterIP
IP Family Policy:  SingleStack
IP Families:       IPv4
IP:                10.96.0.10
IPs:               10.96.0.10
Port:              dns  53/UDP
TargetPort:        53/UDP
Endpoints:         10.244.0.6:53,10.244.0.7:53
Port:              dns-tcp  53/TCP  # 53就是常见dns服务端口
TargetPort:        53/TCP
Endpoints:         10.244.0.6:53,10.244.0.7:53
Port:              metrics  9153/TCP # 提供监控指标端口
TargetPort:        9153/TCP
Endpoints:         10.244.0.6:9153,10.244.0.7:9153
Session Affinity:  None
Events:            <none>


# 找到coredns pod
[root@k8s-master ~]#kubectl -n kube-system get po -l k8s-app=kube-dns -owide
NAME                       READY   STATUS    RESTARTS       AGE   IP           NODE         NOMINATED NODE   READINESS GATES
coredns-74586cf9b6-k5mwm   1/1     Running   1 (2d1h ago)   12d   10.244.0.6   k8s-master   <none>           <none>
coredns-74586cf9b6-xl4bc   1/1     Running   1 (2d1h ago)   12d   10.244.0.7   k8s-master   <none>           <none>

# coredns使用deployment
[root@k8s-master ~]#kubectl -n kube-system get deploy coredns -owide
NAME      READY   UP-TO-DATE   AVAILABLE   AGE   CONTAINERS   IMAGES                                                   SELECTOR
coredns   2/2     2            2           12d   coredns      registry.aliyuncs.com/google_containers/coredns:v1.8.6   k8s-app=kube-dns


# 宿主机是无法使用coredns的,除非你修改resolv.conf,但也没意义,因为该服务是提供给k8s集群内使用的
找个nginx-pod试试?
[root@k8s-master ~]#kubectl -n yuchao run --image=nginx:1.21 ngx01
pod/ngx01 created

[root@k8s-master ~]#kubectl -n yuchao exec -it ngx01 -- bash
root@ngx01:/# cat /etc/resolv.conf
search yuchao.svc.cluster.local svc.cluster.local cluster.local
nameserver 10.96.0.10
options ndots:5
root@ngx01:/#
root@ngx01:/# nslookup
bash: nslookup: command not found
root@ngx01:/# apt update

root@ngx01:/# apt install dnsutils -y

# 试试域名解析,好使吗
root@ngx01:/# nslookup eladmin-api
Server:        10.96.0.10
Address:    10.96.0.10#53

Name:    eladmin-api.yuchao.svc.cluster.local
Address: 10.110.57.234


root@ngx01:/# nslookup mysql
Server:        10.96.0.10
Address:    10.96.0.10#53

Name:    mysql.yuchao.svc.cluster.local
Address: 10.106.247.171

root@ngx01:/# nslookup redis
Server:        10.96.0.10
Address:    10.96.0.10#53

Name:    redis.yuchao.svc.cluster.local
Address: 10.105.65.167

root@ngx01:/#


# 发现找到的是什么?分别是eladmin/mysql/redis的service-IP
# 注意,为什么能解析出来?因为他们是同一个namespace下的
# 请注意,coredns的搜索域,不在一个ns下,你就没法用服务发现,域名解析了。
测试换一个ns下,到这就能看懂了把,就得访问完整的FQDN。
[root@k8s-master ~]#kubectl run --image=nginx:1.21 ngx01
pod/ngx01 created
[root@k8s-master ~]#kubectl exec -it ngx01 -- bash
root@ngx01:/# cat /etc/resolv.conf
search default.svc.cluster.local svc.cluster.local cluster.local
nameserver 10.96.0.10
options ndots:5
root@ngx01:/#
root@ngx01:/# curl eladmin-api:8000/who
curl: (6) Could not resolve host: eladmin-api
root@ngx01:/#
root@ngx01:/#
root@ngx01:/# curl eladmin-api.yuchao.svc.cluster.local:8000/who
"Who are you ? I am teacher yuchao and my website is www.yuchaoit.cn ! "root@ngx01:/#
root@ngx01:/#

# 只要指定了正确的搜索dns域,即可完成服务发现,解析域名。
图解coredns服务发现
svc的服务注册
流程理解
- 创建pod、deployment等后端程序
- 创建service、定义label后
- pod副本动态扩缩容等信息,都会自动注册到service的Endpoints里
- 我们只要访问svc、即可自动找到后端的服务节点
svc的服务发现
服务发现是指,我们只需要访问如eladmin-api.yuchao.svc.cluster.local:8000/who
访问域名,即可找到你的程序,并且效率远高于nacos、eureka、consul
并且该第三方服务发现组件,可能自身存在的故障问题,导致微服务架构故障,服务调用失败;
Service负载均衡之NodePort
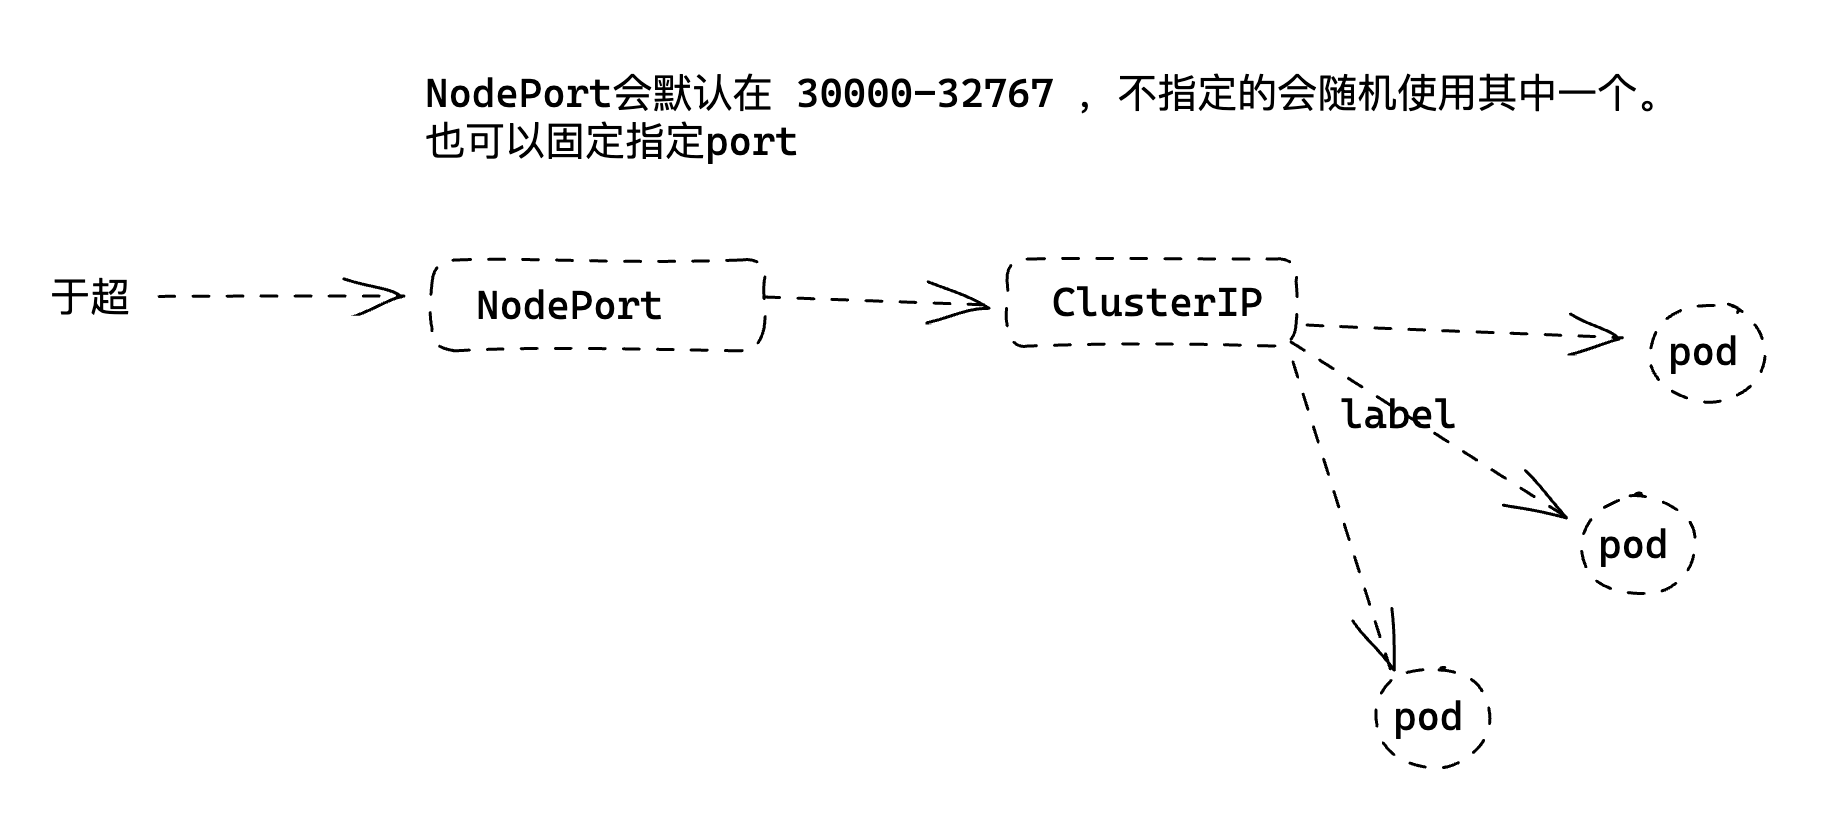
cluster-ip为虚拟地址,只能在k8s集群内部进行访问,集群外部如果访问内部服务,实现方式之一为使用NodePort方式。
NodePort会默认在 30000-32767 ,不指定的会随机使用其中一个。
大部分公司,会选择直接用svc的nodeport进行业务发布,对外提供访问了。
例如可以用阿里云的SLB,直接绑定svc的nodeport业务端口,完成业务上线发布。
默认的clusterIP
[root@k8s-master ~]#kubectl -n yuchao describe svc eladmin-api  |grep -i type
Type:              ClusterIP


# 你现在想反问后端节点,只能在k8s的机器集群内,通过如域名访问
# 宿主机只能走svc-ip去访问
[root@k8s-master ~]#curl 10.110.57.234:8000/who
"Who are you ? I am teacher yuchao and my website is www.yuchaoit.cn ! "
我如果想从windows访问怎么整?
修改nodeport
$ cat service-eladmin-api-nodeport.yaml
apiVersion: v1
kind: Service
metadata:
  name: eladmin-api-nodeport
  namespace: yuchao
spec:
  ports:
  - port: 8000
    protocol: TCP
    targetPort: 8000
  selector:
    app: eladmin-api
  type: NodePort
创建
[root@k8s-master ~]#kubectl create -f svc-eladmin-api-nodeport.yaml
service/eladmin-api-nodeport created
[root@k8s-master ~]#
[root@k8s-master ~]#kubectl -n yuchao get svc -owide
NAME                   TYPE        CLUSTER-IP       EXTERNAL-IP   PORT(S)          AGE    SELECTOR
eladmin-api            ClusterIP   10.110.57.234    <none>        8000/TCP         28h    app=eladmin-api
eladmin-api-nodeport   NodePort    10.102.180.185   <none>        8000:30266/TCP   7s     app=eladmin-api
mysql                  ClusterIP   10.106.247.171   <none>        3306/TCP         2d1h   app=mysql
redis                  ClusterIP   10.105.65.167    <none>        6379/TCP         2d1h   app=redis
[root@k8s-master ~]#

# 查看svc详细
[root@k8s-master ~]#kubectl -n yuchao describe svc eladmin-api-nodeport
Name:                     eladmin-api-nodeport
Namespace:                yuchao
Labels:                   <none>
Annotations:              <none>
Selector:                 app=eladmin-api
Type:                     NodePort
IP Family Policy:         SingleStack
IP Families:              IPv4
IP:                       10.102.180.185
IPs:                      10.102.180.185
Port:                     <unset>  8000/TCP
TargetPort:               8000/TCP
NodePort:                 <unset>  30266/TCP
Endpoints:                10.244.0.21:8000,10.244.1.14:8000,10.244.2.30:8000 + 1 more...
Session Affinity:         None
External Traffic Policy:  Cluster
Events:                   <none>
访问nodeport(注意)
集群内每个节点的NodePort端口都会进行监听。
但这其实是一个较为危险的行为,如果是规模较大的k8s集群,会监听所有集群节点nodeport,若是没做好安全防护,只要端口可访问,就容易被攻击。
小公司的话,机器数量较少,也是有公司在用。
当然我们应该学习更为专业的ingress。
在ipvs模式下,svc-ip会绑定到一个虚拟网卡ip addr show kube-ipvs0上。
用完删除即可
[root@k8s-master ~]#kubectl delete  -f svc-eladmin-api-nodeport.yaml
service "eladmin-api-nodeport" deleted
解释nodeport
nodeport是允许外部流量,转发给k8s集群内部,本身也会生成clusterIP,也可以访问。
等于额外打开了一个端口提供访问。
The Service "eladmin-api-nodeport" is invalid: spec.ports[0].nodePort: Invalid value: 18000: provided port is not in the valid range. The range of valid ports is 30000-32767
我们也可以固定nodeport端口
apiVersion: v1
kind: Service
metadata:
  name: eladmin-api-nodeport
  namespace: yuchao
spec:
  ports:
  - port: 8000
    nodePort: 31000
    protocol: TCP
    targetPort: 8000
  selector:
    app: eladmin-api
  type: NodePort
创建结果
[root@k8s-master ~]#kubectl -n yuchao get svc -owide
NAME                   TYPE        CLUSTER-IP       EXTERNAL-IP   PORT(S)          AGE    SELECTOR
eladmin-api            ClusterIP   10.110.57.234    <none>        8000/TCP         28h    app=eladmin-api
eladmin-api-nodeport   NodePort    10.102.180.185   <none>        8000:31000/TCP   25m    app=eladmin-api
mysql                  ClusterIP   10.106.247.171   <none>        3306/TCP         2d1h   app=mysql
redis                  ClusterIP   10.105.65.167    <none>        6379/TCP         2d1h   app=redis
[root@k8s-master ~]#

#
访问结果
[root@k8s-master ~]#
[root@k8s-master ~]#curl 10.0.0.80:31000/who
"Who are you ? I am teacher yuchao and my website is www.yuchaoit.cn ! "
解释kube-ipvs0
kube-ipvs0 是 Kubernetes 集群中一个虚拟的网络接口,它是 IPVS (IP Virtual Server) 负载均衡器的一部分。
在 Kubernetes 中,kube-proxy 通过 kube-ipvs0 接口将网络流量转发到正确的 Pod 上。
IPVS 负责实现 kube-proxy 的负载均衡功能,根据预设的负载均衡算法将流量分发到不同的 Pod 上。
kube-ipvs0 接口会在集群节点上自动创建,并在需要时自动配置。
使用 kube-ipvs0 和 IPVS 负载均衡器可以提高 Kubernetes 的性能和可靠性,减轻 Pod 直接通信的负担,同时提供了高可用性和可扩展性。
LoadBalancer模式
该模式暂时不用,主要是结合阿里云等。
在使用支持外部负载均衡器的云提供商的服务时,设置 type 的值为 "LoadBalancer", 将为 Service 提供负载均衡器。
负载均衡器是异步创建的,关于被提供的负载均衡器的信息将会通过 Service 的 status.loadBalancer 字段发布出去。
https://kubernetes.io/zh-cn/docs/concepts/services-networking/service/#loadbalancer
Service综合技能图解
关于我们近阶段,k8s部署应用的综合知识
- pod
- deployment
- 数据库
- 后端
- 前端
- service