helm
为什么学helm
chart就是例如装一个wordpress所需的所有资源yaml的模板,方便你一键安装复杂应用。
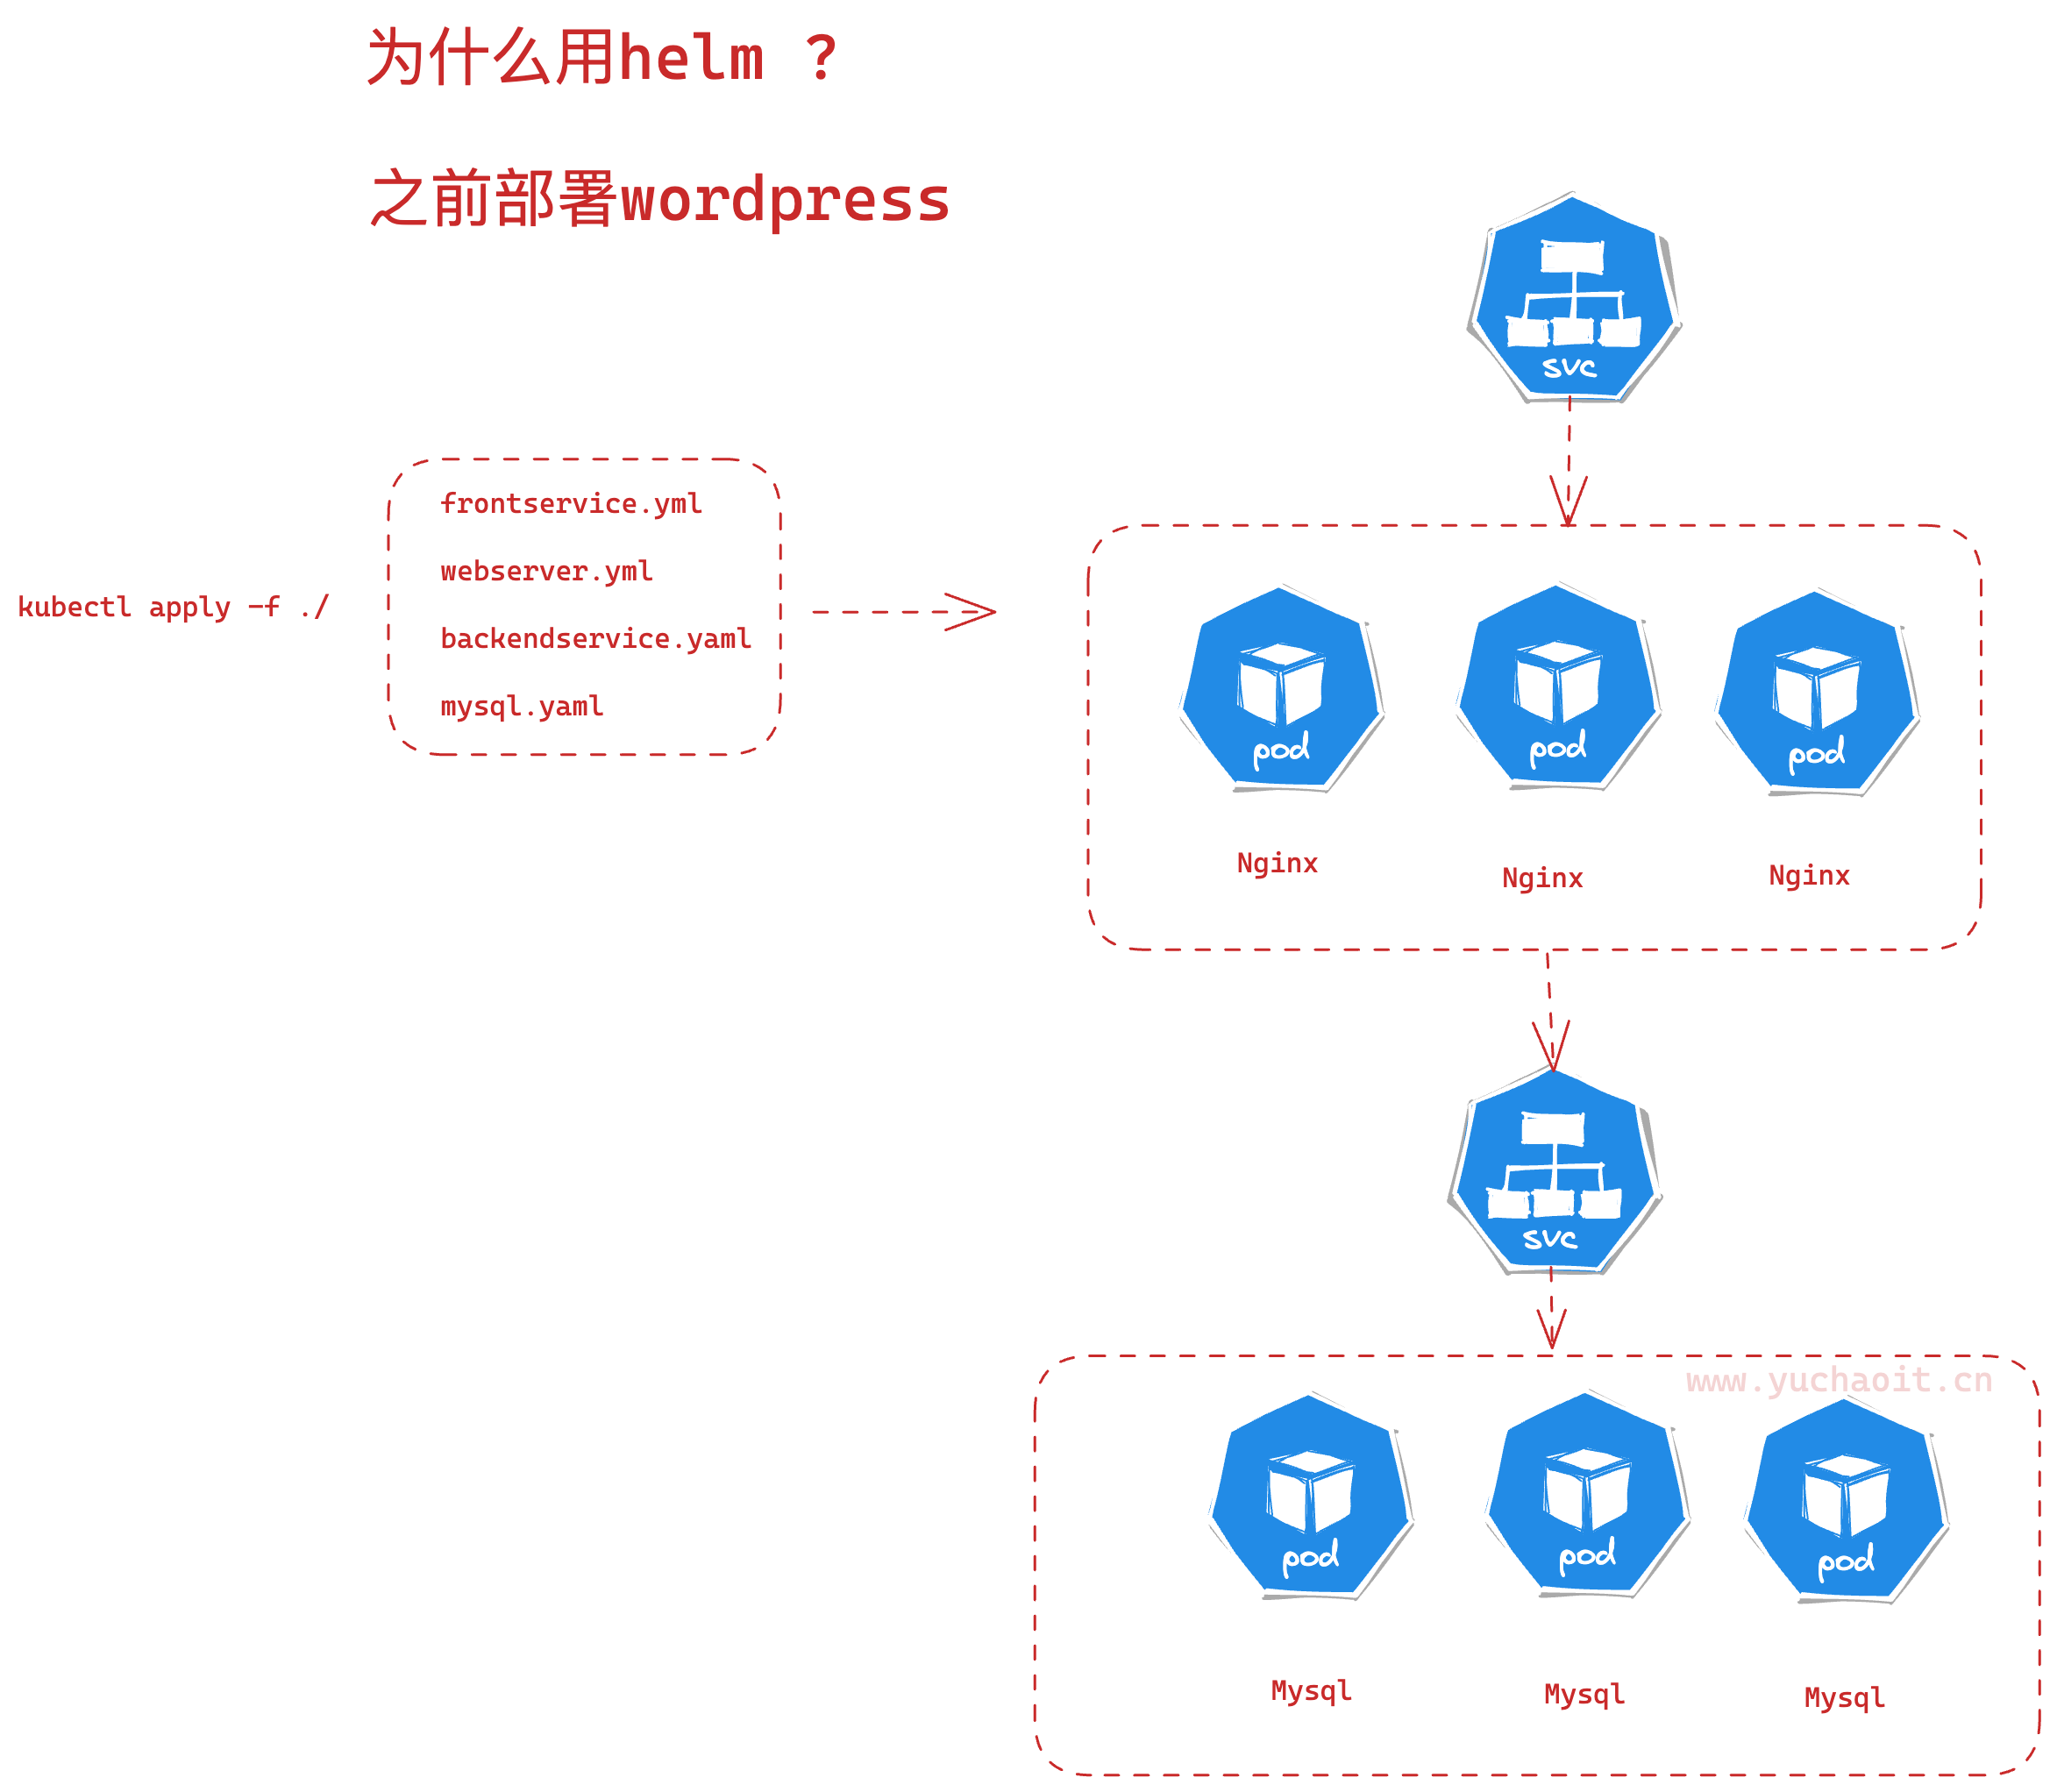
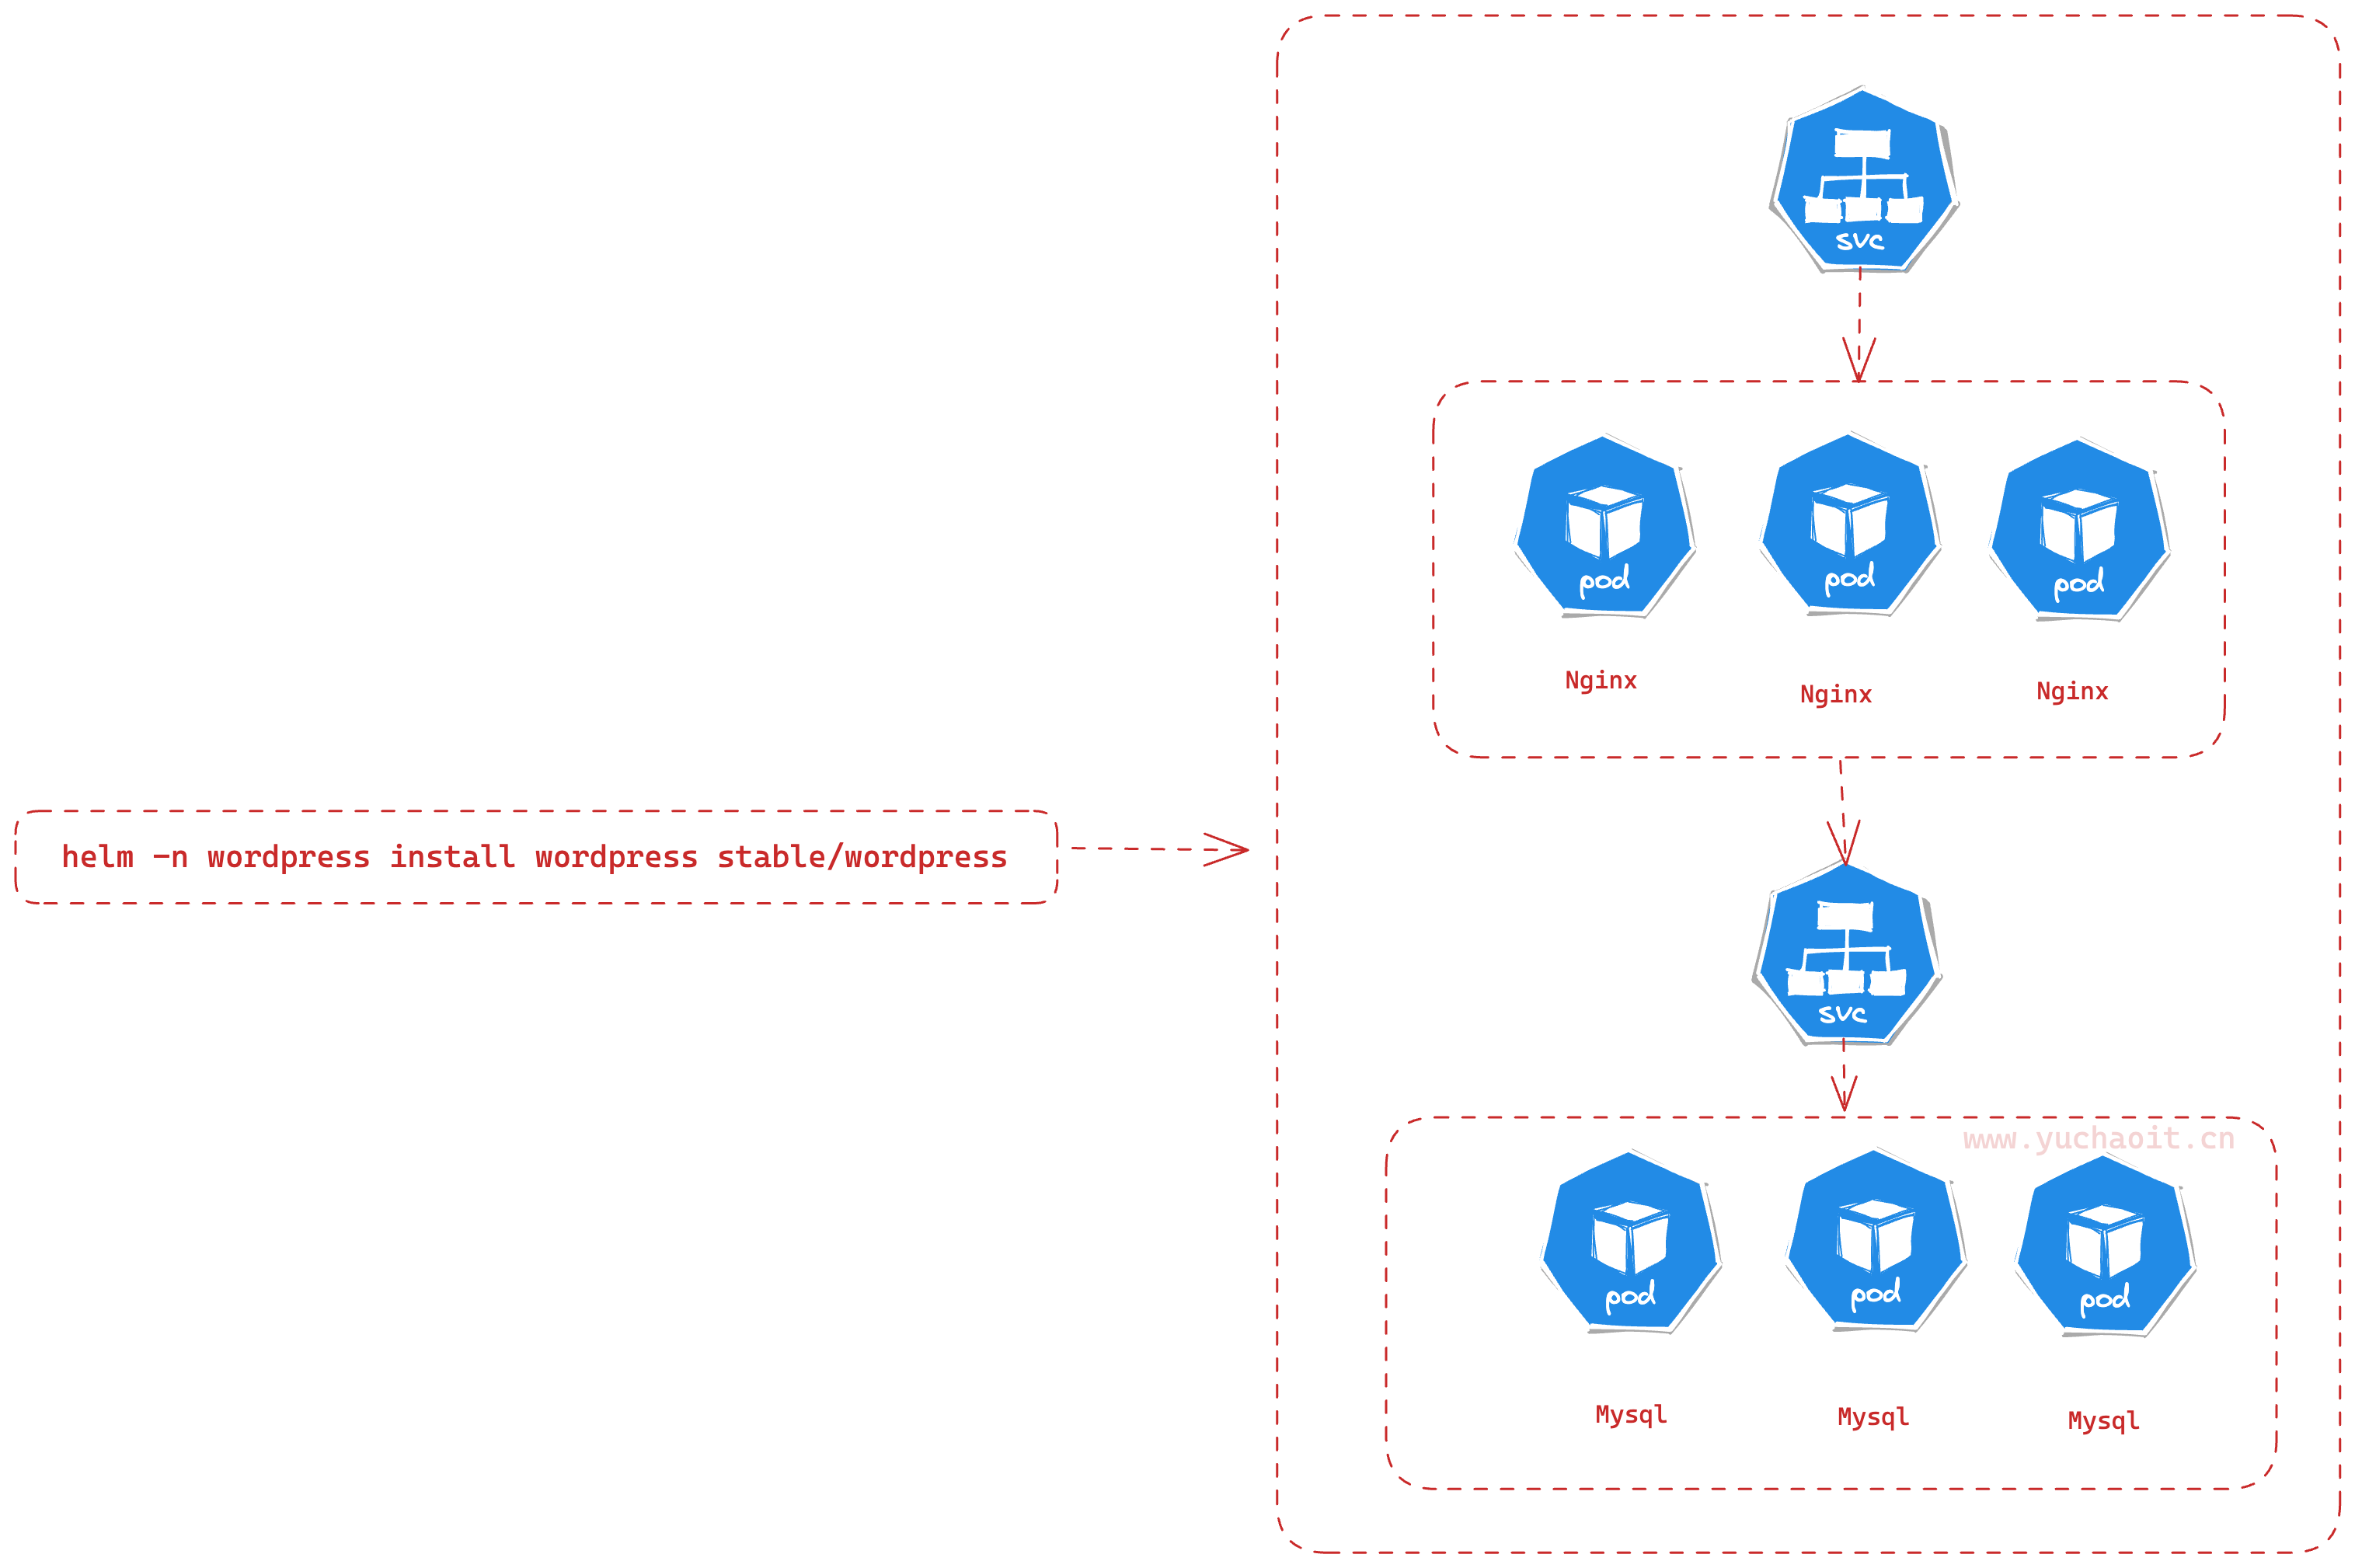
用helm之后
Helm是一个开源的Kubernetes包管理器,它能够使您更加容易地管理和部署Kubernetes应用程序。以下是一些学习Helm的理由:
- 自动化应用程序部署和管理:Helm提供了一种标准化的方式来部署和管理Kubernetes应用程序,这样您就可以更快地完成这些任务。
- 可重用的应用程序包:Helm允许您将应用程序打包成一个Chart,这个Chart可以在不同的环境中进行重复使用。这样,您可以更快地部署应用程序,并且可以避免出现部署错误。
- 安全:Helm使用数字签名来保证Chart的安全性。这意味着,如果Chart被篡改,Helm将无法安装它,从而保证了应用程序的安全性。
- 社区支持:Helm是一个非常流行的工具,拥有一个庞大的社区。如果您遇到任何问题,很容易就能找到解决方案或得到帮助。
因此,学习Helm可以让您更加高效地部署和管理Kubernetes应用程序,同时也可以提高应用程序的安全性。
公司如何使用helm
- 创建自己的Chart:公司可以创建自己的Chart来打包和部署应用程序。这样可以让不同的团队更加容易地管理和部署应用程序。
- 使用公共Chart库:Helm有一个公共的Chart库,里面有许多常用的应用程序,公司可以直接使用这些Chart来快速部署应用程序。
- 集成到CI/CD流程中:Helm可以与CI/CD工具集成,使得公司能够在持续集成和持续交付过程中更容易地部署和管理应用程序。
- 部署到多个环境:公司可以使用Helm来部署应用程序到多个环境中,例如开发、测试、预生产和生产环境。这可以帮助公司更加高效地管理不同的环境,并确保应用程序的稳定性。
- 使用Helm插件:Helm有许多插件可以帮助公司更加高效地管理应用程序。例如,可以使用插件来管理Chart的依赖关系、验证Chart的正确性等。
helm的一些概念
Helm是一种Kubernetes应用程序包管理器,用于简化在Kubernetes上部署和管理应用程序。以下是Helm中的一些重要概念:
- Chart:一个Helm应用程序包的集合。每个Chart都包括Kubernetes对象定义(如部署、服务等)以及用于配置和自定义部署的模板文件。
- Release:Helm Chart的一个特定版本实例。一个Chart可以在同一个Kubernetes集群中部署多次,每次都会生成一个新的Release。
- Repository:一个Helm Chart的存储库。可以从多个Repository中安装和升级Charts。
- Values:一个Helm Chart的配置值。Values文件允许用户指定要用于创建Release的参数和变量。
- Template:用于生成Kubernetes YAML文件的Go模板。Templates可以使用Values文件中的值进行自定义,并允许将Kubernetes对象定义与应用程序代码分离。
- Hook:在Release安装或卸载期间运行的操作。Hooks可用于执行各种任务,例如运行数据库迁移或备份。
- Dependency:一个Chart的依赖项,它定义了一个Chart需要的其他Charts。Helm将自动处理依赖项并安装所有必需的Charts。
helm 是包管理工具,包就是指 chart,helm 能够:
- 从零创建chart
- 与仓库交互,拉取、保存、更新 chart
- 在kubernetes集群中安装、卸载 release
- 更新、回滚、测试 release
helm常用命令
以下是常用的 Helm 命令及其中文解释:
helm install [name] [chart]: 安装一个 Helm Chart。helm upgrade [name] [chart]: 升级已安装的 Helm Chart。helm uninstall [name]: 卸载一个已安装的 Helm Chart。helm list: 列出已安装的 Helm Charts。helm repo add [name] [url]: 添加一个 Helm Chart 仓库。helm repo update: 更新已添加的 Helm Chart 仓库。helm search [keyword]: 搜索符合关键字的 Helm Chart。helm package [path]: 打包一个 Helm Chart。helm lint [path]: 检查一个 Helm Chart 是否符合规范。helm template [chart]: 以模板的形式输出 Helm Chart。helm history [name]: 查看已安装的 Helm Chart 的版本历史记录。helm rollback [name] [version]: 回滚已安装的 Helm Chart 到指定版本。helm status [name]: 查看已安装的 Helm Chart 的状态。helm repo remove [name]: 移除一个已添加的 Helm Chart 仓库。helm version: 查看 Helm 的版本信息。
安装Helm
下载最新的稳定版本:https://get.helm.sh/helm-v3.2.4-linux-amd64.tar.gz
# wget https://get.helm.sh/helm-v3.2.4-linux-amd64.tar.gz
# tar -xf helm-v3.2.4-linux-amd64.tar.gz
# mv helm /usr/bin/


[root@k8s-master ~]#helm version
version.BuildInfo{Version:"v3.2.4", GitCommit:"0ad800ef43d3b826f31a5ad8dfbb4fe05d143688", GitTreeState:"clean", GoVersion:"go1.13.12"}

[root@k8s-master ~]#helm env
HELM_BIN="helm"
HELM_DEBUG="false"
HELM_KUBEAPISERVER=""
HELM_KUBECONTEXT=""
HELM_KUBETOKEN=""
HELM_NAMESPACE="default"
HELM_PLUGINS="/root/.local/share/helm/plugins"
HELM_REGISTRY_CONFIG="/root/.config/helm/registry.json"
HELM_REPOSITORY_CACHE="/root/.cache/helm/repository"
HELM_REPOSITORY_CONFIG="/root/.config/helm/repositories.yaml"
[root@k8s-master ~]#

# 查看有哪些仓库
[root@k8s-master ~]#helm repo ls
Error: no repositories to show

# 添加一个仓库
# https://charts.bitnami.com/
# 简单对比yum repo去理解即可,只不过helm得repo存储的是charts,是一组管理k8s的模板,用于自动化安装k8s程序

# 添加命令
[root@k8s-master ~]#helm repo add stable https://charts.bitnami.com/bitnami

"stable" has been added to your repositories
[root@k8s-master ~]#
[root@k8s-master ~]#helm repo ls
NAME      URL
stable    https://charts.bitnami.com/bitnami

# 同步最新charts信息到本地
[root@k8s-master ~]#helm repo update
Hang tight while we grab the latest from your chart repositories...
...Successfully got an update from the "stable" chart repository
Update Complete. ⎈ Happy Helming!⎈
helm安装wordpress
# helm 搜索chart包
[root@k8s-master ~]# helm search repo wordpress
NAME                      CHART VERSION    APP VERSION    DESCRIPTION
stable/wordpress          16.0.0           6.2.0          WordPress is the world's most popular blogging ...
stable/wordpress-intel    2.1.31           6.1.1          DEPRECATED WordPress for Intel is the most popu...
[root@k8s-master ~]#


# 创建namespace去管理应用
[root@k8s-master ~]#kubectl create namespace wordpress
namespace/wordpress created

# 从仓库安装,并且
$ helm -n wordpress install wordpress stable/wordpress --set mariadb.primary.persistence.enabled=false --set service.type=ClusterIP --set ingress.enabled=true --set persistence.enabled=false --set ingress.hostname=wordpress.yuchaoit.cn
这条命令使用 Helm 包管理器在 Kubernetes 集群中安装 WordPress 应用程序。以下是命令中使用的不同选项的说明:
-n wordpress:指定 Helm 发布的名称为 "wordpress",以便稍后可以引用该发布。install:指示 Helm 安装一个新的 Chart(包含 WordPress 应用程序的定义和相关配置)。wordpress:Chart 的名称,此处使用的是名为 "stable/wordpress" 的官方 Chart。--set mariadb.primary.persistence.enabled=false:禁用 MariaDB 数据库的持久性存储。--set service.type=ClusterIP:指定 WordPress 服务类型为 ClusterIP,表示仅在 Kubernetes 集群内部可用。--set ingress.enabled=true:启用 Kubernetes Ingress 控制器,允许外部访问 WordPress。--set persistence.enabled=false:禁用 WordPress 应用程序的持久性存储。--set ingress.hostname=wordpress.yuchaoit.cn:将 Ingress 控制器配置为将域名 "wordpress.yuchaoit.cn" 映射到 WordPress 服务。
检查安装的wordpress,后续通过kubectl管理
[root@k8s-master ~]#helm -n wordpress install wordpress stable/wordpress --set mariadb.primary.persistence.enabled=false --set service.type=ClusterIP --set ingress.enabled=true --set persistence.enabled=false --set ingress.hostname=wordpress.yuchaoit.cn
NAME: wordpress
LAST DEPLOYED: Mon Apr 24 14:16:09 2023
NAMESPACE: wordpress
STATUS: deployed
REVISION: 1
TEST SUITE: None
NOTES:
CHART NAME: wordpress
CHART VERSION: 16.0.0
APP VERSION: 6.2.0

** Please be patient while the chart is being deployed **

Your WordPress site can be accessed through the following DNS name from within your cluster:

    wordpress.wordpress.svc.cluster.local (port 80)

To access your WordPress site from outside the cluster follow the steps below:

1. Get the WordPress URL and associate WordPress hostname to your cluster external IP:

   export CLUSTER_IP=$(minikube ip) # On Minikube. Use: `kubectl cluster-info` on others K8s clusters
   echo "WordPress URL: http://wordpress.yuchaoit.cn/"
   echo "$CLUSTER_IP  wordpress.yuchaoit.cn" | sudo tee -a /etc/hosts

2. Open a browser and access WordPress using the obtained URL.

3. Login with the following credentials below to see your blog:

  echo Username: user
  echo Password: $(kubectl get secret --namespace wordpress wordpress -o jsonpath="{.data.wordpress-password}" | base64 -d)
[root@k8s-master ~]#
查看helm都装了什么东西,这就是helm能帮你安装一套k8s应用。
等待片刻,以及可以通过logs检查,确认所有资源都启动成功。
[root@k8s-master ~]#kubectl -n wordpress get all
NAME                             READY   STATUS    RESTARTS   AGE
pod/wordpress-5f66b8546b-jrfkb   1/1     Running   0          4m44s
pod/wordpress-mariadb-0          1/1     Running   0          4m44s

NAME                        TYPE        CLUSTER-IP       EXTERNAL-IP   PORT(S)          AGE
service/wordpress           ClusterIP   10.99.183.7      <none>        80/TCP,443/TCP   4m44s
service/wordpress-mariadb   ClusterIP   10.109.177.193   <none>        3306/TCP         4m44s

NAME                        READY   UP-TO-DATE   AVAILABLE   AGE
deployment.apps/wordpress   1/1     1            1           4m44s

NAME                                   DESIRED   CURRENT   READY   AGE
replicaset.apps/wordpress-5f66b8546b   1         1         1       4m44s

NAME                                 READY   AGE
statefulset.apps/wordpress-mariadb   1/1     4m44s
[root@k8s-master ~]#

# 查看ingress规则
[root@k8s-master ~]#kubectl -n wordpress get ingress
NAME        CLASS    HOSTS                   ADDRESS   PORTS   AGE
wordpress   <none>   wordpress.yuchaoit.cn             80      5m59s

# 查看release
[root@k8s-master ~]#helm -n wordpress ls
NAME         NAMESPACE    REVISION    UPDATED                                    STATUS      CHART               APP VERSION
wordpress    wordpress    1           2023-04-24 14:16:09.083797202 +0800 CST    deployed    wordpress-16.0.0    6.2.0
访问wordpress
通过ingress访问
10.0.0.80 wordpress.yuchaoit.cn
发现404访问不了,问题在chart不适配k8s的ingress-nginx,需要添加上ingressClassName: nginx
[root@k8s-master ~]#kubectl -n wordpress edit ingress wordpress

...
spec:
  ingressClassName: nginx
  rules:
  - host: wordpress.yuchaoit.cn
    http:
      paths:
      - backend:
          service:
            name: wordpress
            port:
              name: http
        path: /
        pathType: ImplementationSpecific
status:
  loadBalancer: {}
这个 ingressClassName: nginx 是指将该Ingress资源指定为使用名为nginx的Ingress Controller。
一个Ingress Controller是一个可以理解Ingress资源并为其提供反向代理服务的组件。 Kubernetes集群中可以运行多个不同的Ingress Controller,每个Ingress资源可以使用其中一个Ingress Controller。
在本例中,这个Ingress资源将使用名为nginx的Ingress Controller。 这意味着该Ingress资源将使用nginx的反向代理服务,将来自wordpress.yuchaoit.cn主机的流量路由到相应的后端服务。
再次访问
[root@k8s-master ~]#kubectl -n wordpress logs wordpress-5f66b8546b-jrfkb -f


# 获取密码
[root@k8s-master ~]#kubectl get secret --namespace wordpress wordpress -o jsonpath="{.data.wordpress-password}" | base64 -d
Yrj0yZbeP4

# 账户是 user   密码 Yrj0yZbeP4

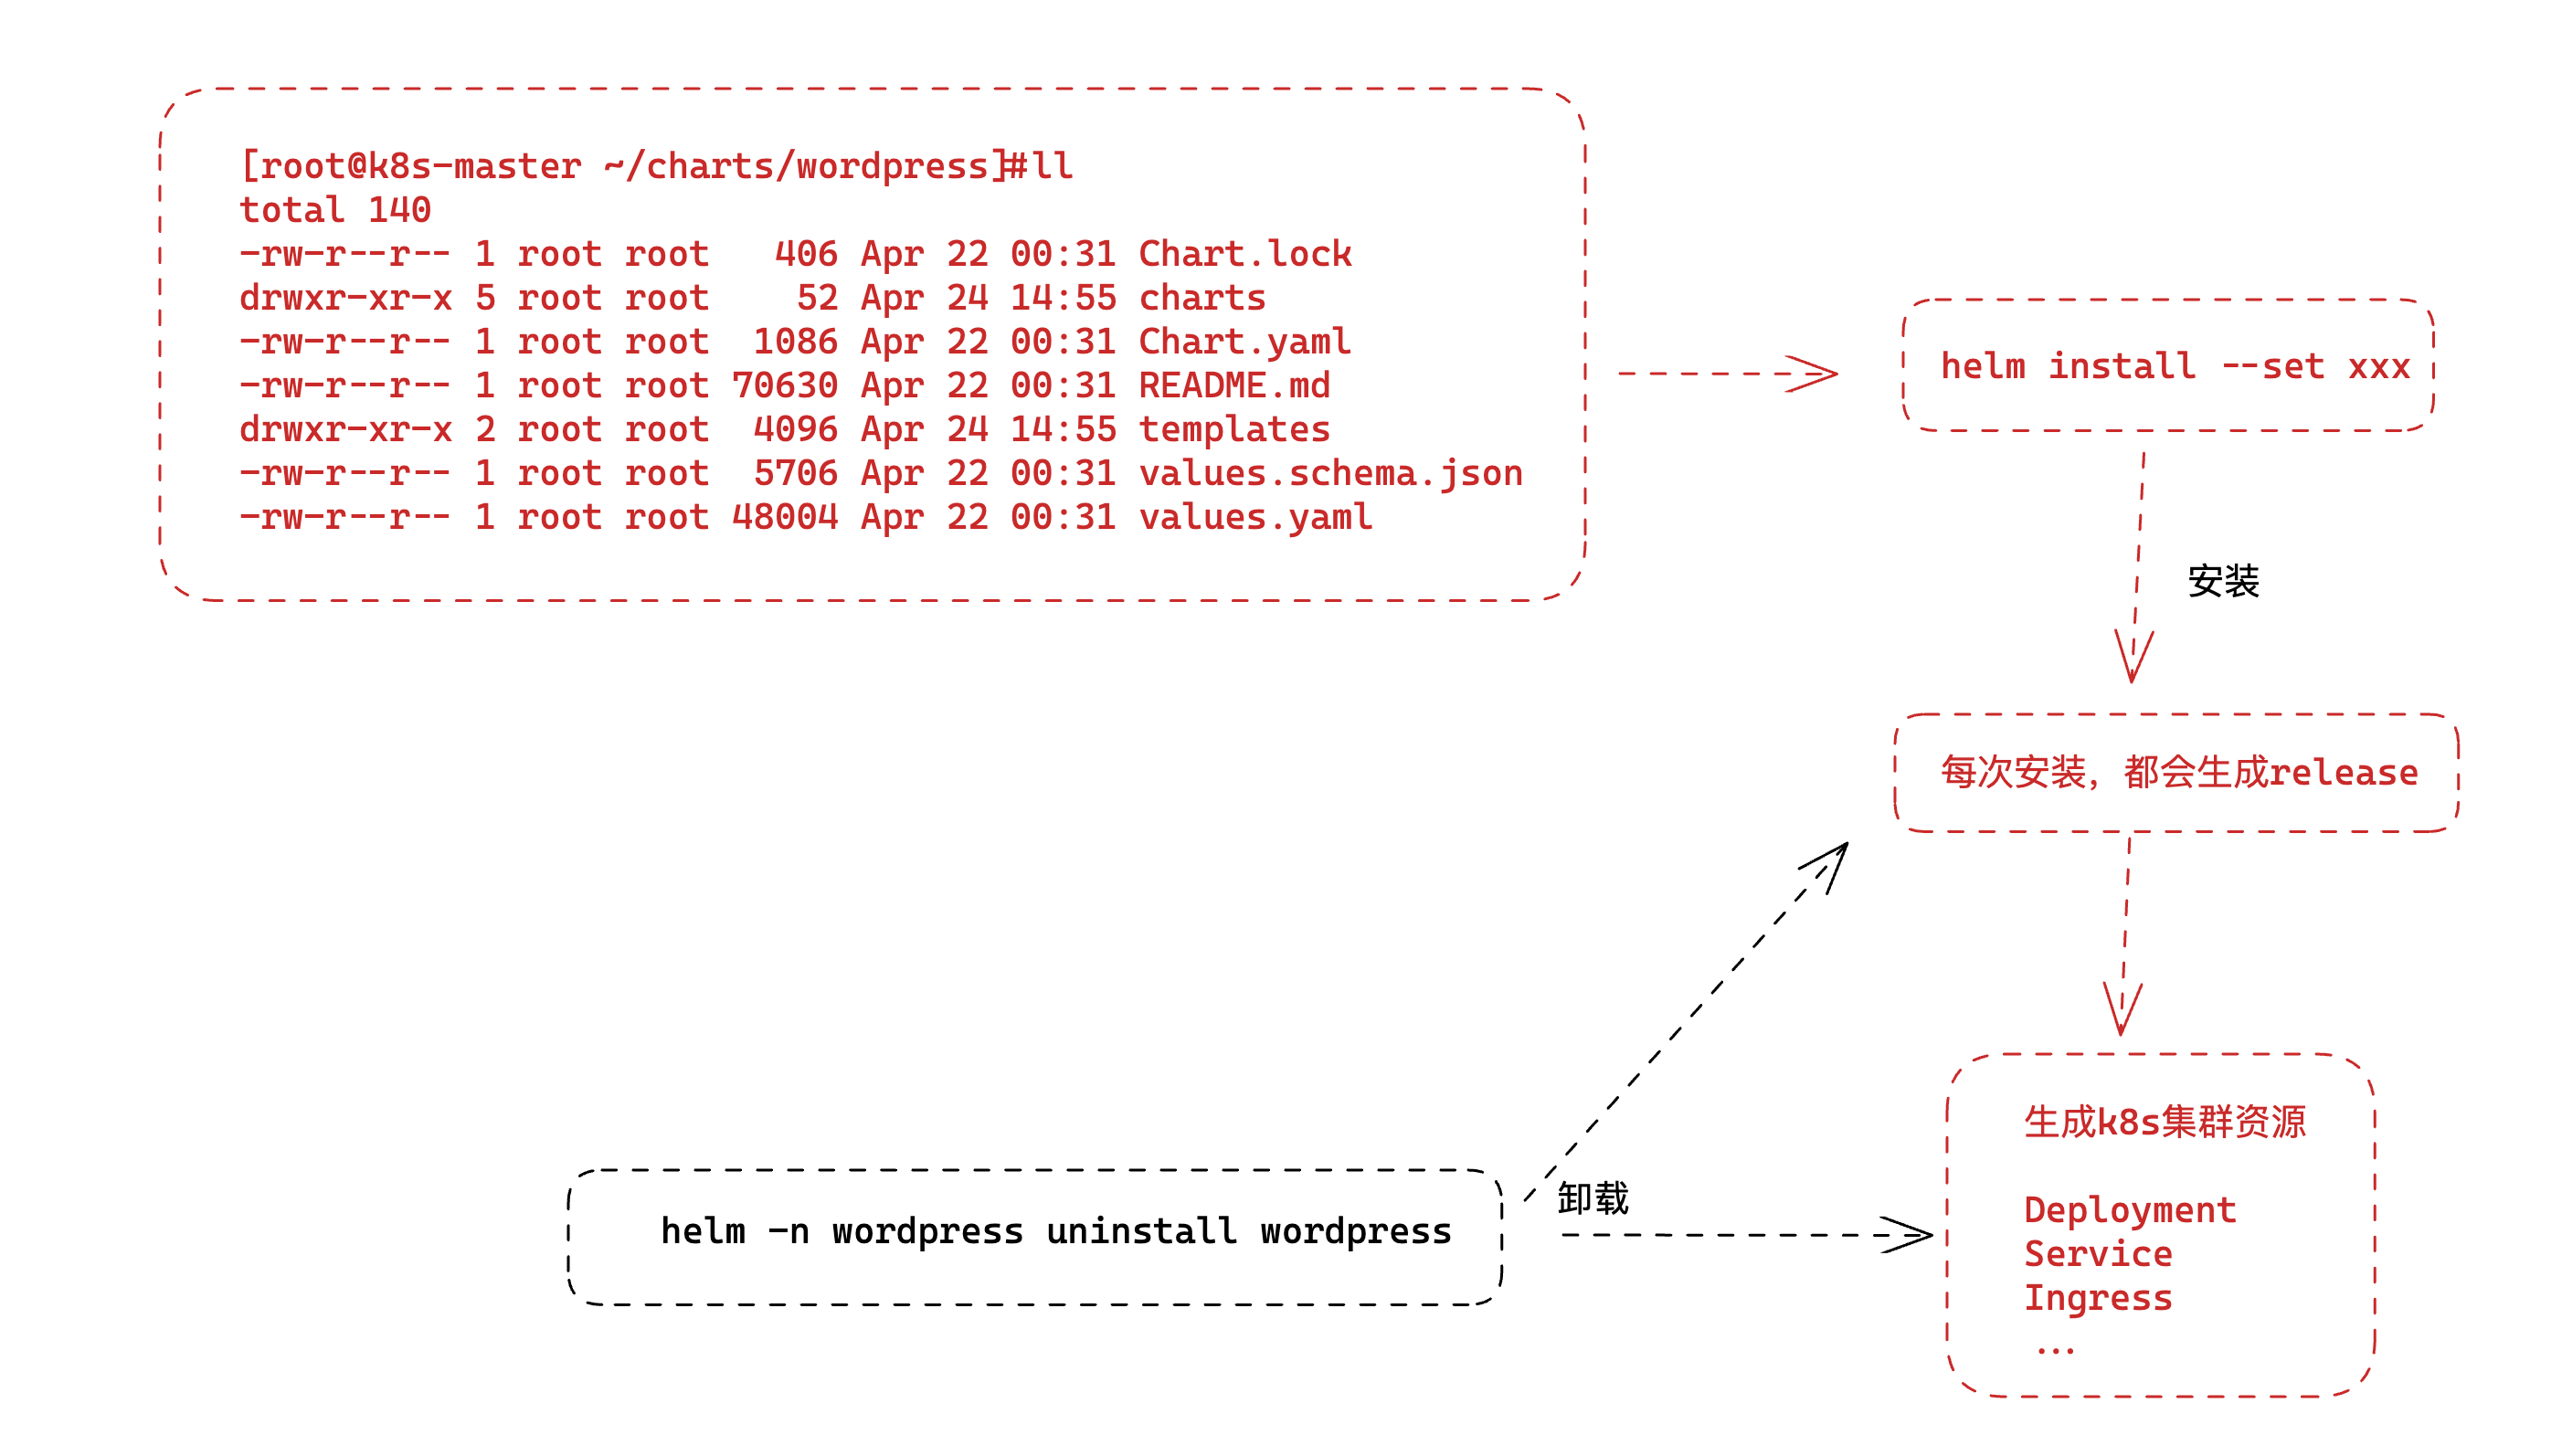
下载wordpress的chart
chart就是例如装一个wordpress所需的所有资源yaml的模板,方便你一键安装复杂应用。
[root@k8s-master ~/charts]#mkdir charts ; cd charts;helm pull stable/wordpress
[root@k8s-master ~/charts]#ls
wordpress-16.0.0.tgz

# 包含了部署wordpress所有的yaml
[root@k8s-master ~/charts]#tar -xf wordpress-16.0.0.tgz

[root@k8s-master ~/charts]#ls
wordpress  wordpress-16.0.0.tgz

[root@k8s-master ~/charts/wordpress]#ls
Chart.lock  charts  Chart.yaml  README.md  templates  values.schema.json  values.yaml
- Chart.lock: 包含当前安装的 chart 的版本和依赖项信息的锁定文件。
- charts: 该目录用于存储本chart依赖的其他chart的压缩包文件。
- Chart.yaml: 包含 chart 的基本元数据信息,例如名称、版本号、描述、维护者等。
- README.md: 包含有关如何使用 chart 的说明和相关信息的文件。
- templates: 该目录包含用于生成 Kubernetes 资源的模板文件,例如 Deployment、Service、ConfigMap、Secret 等。
- values.schema.json: 包含 values.yaml 文件的架构(schema)信息,以指导用户正确配置 values.yaml 文件中的值。
- values.yaml: 包含用于配置 chart 的值的 YAML 文件,例如 Pod 的副本数、映像版本、服务类型等。
# 查看k8s资源的模板yaml
[root@k8s-master ~/charts/wordpress]#ls templates/
config-secret.yaml       extra-list.yaml  httpd-configmap.yaml  networkpolicy-backend-ingress.yaml  NOTES.txt                pvc.yaml             servicemonitor.yaml
deployment.yaml          _helpers.tpl     ingress.yaml          networkpolicy-egress.yaml           pdb.yaml                 secrets.yaml         svc.yaml
externaldb-secrets.yaml  hpa.yaml         metrics-svc.yaml      networkpolicy-ingress.yaml          postinit-configmap.yaml  serviceaccount.yaml  tls-secrets.yaml

# 模板文件需要传值,如版本号,用户名,密码等,通过values.yaml传入

# template.yaml + value.yaml = k8s mnifests
↓
安装部署k8s
↓
helm是通过kubectl的证书,获取的集群操作权限。
卸载wordpress
[root@k8s-master ~/charts/wordpress]#helm -n wordpress uninstall wordpress
release "wordpress" uninstalled
[root@k8s-master ~/charts/wordpress]#
[root@k8s-master ~/charts/wordpress]#kubectl -n wordpress get all
No resources found in wordpress namespace.

[root@k8s-master ~/charts/wordpress]#helm -n wordpress ls
NAME    NAMESPACE    REVISION    UPDATED    STATUS    CHART    APP VERSION
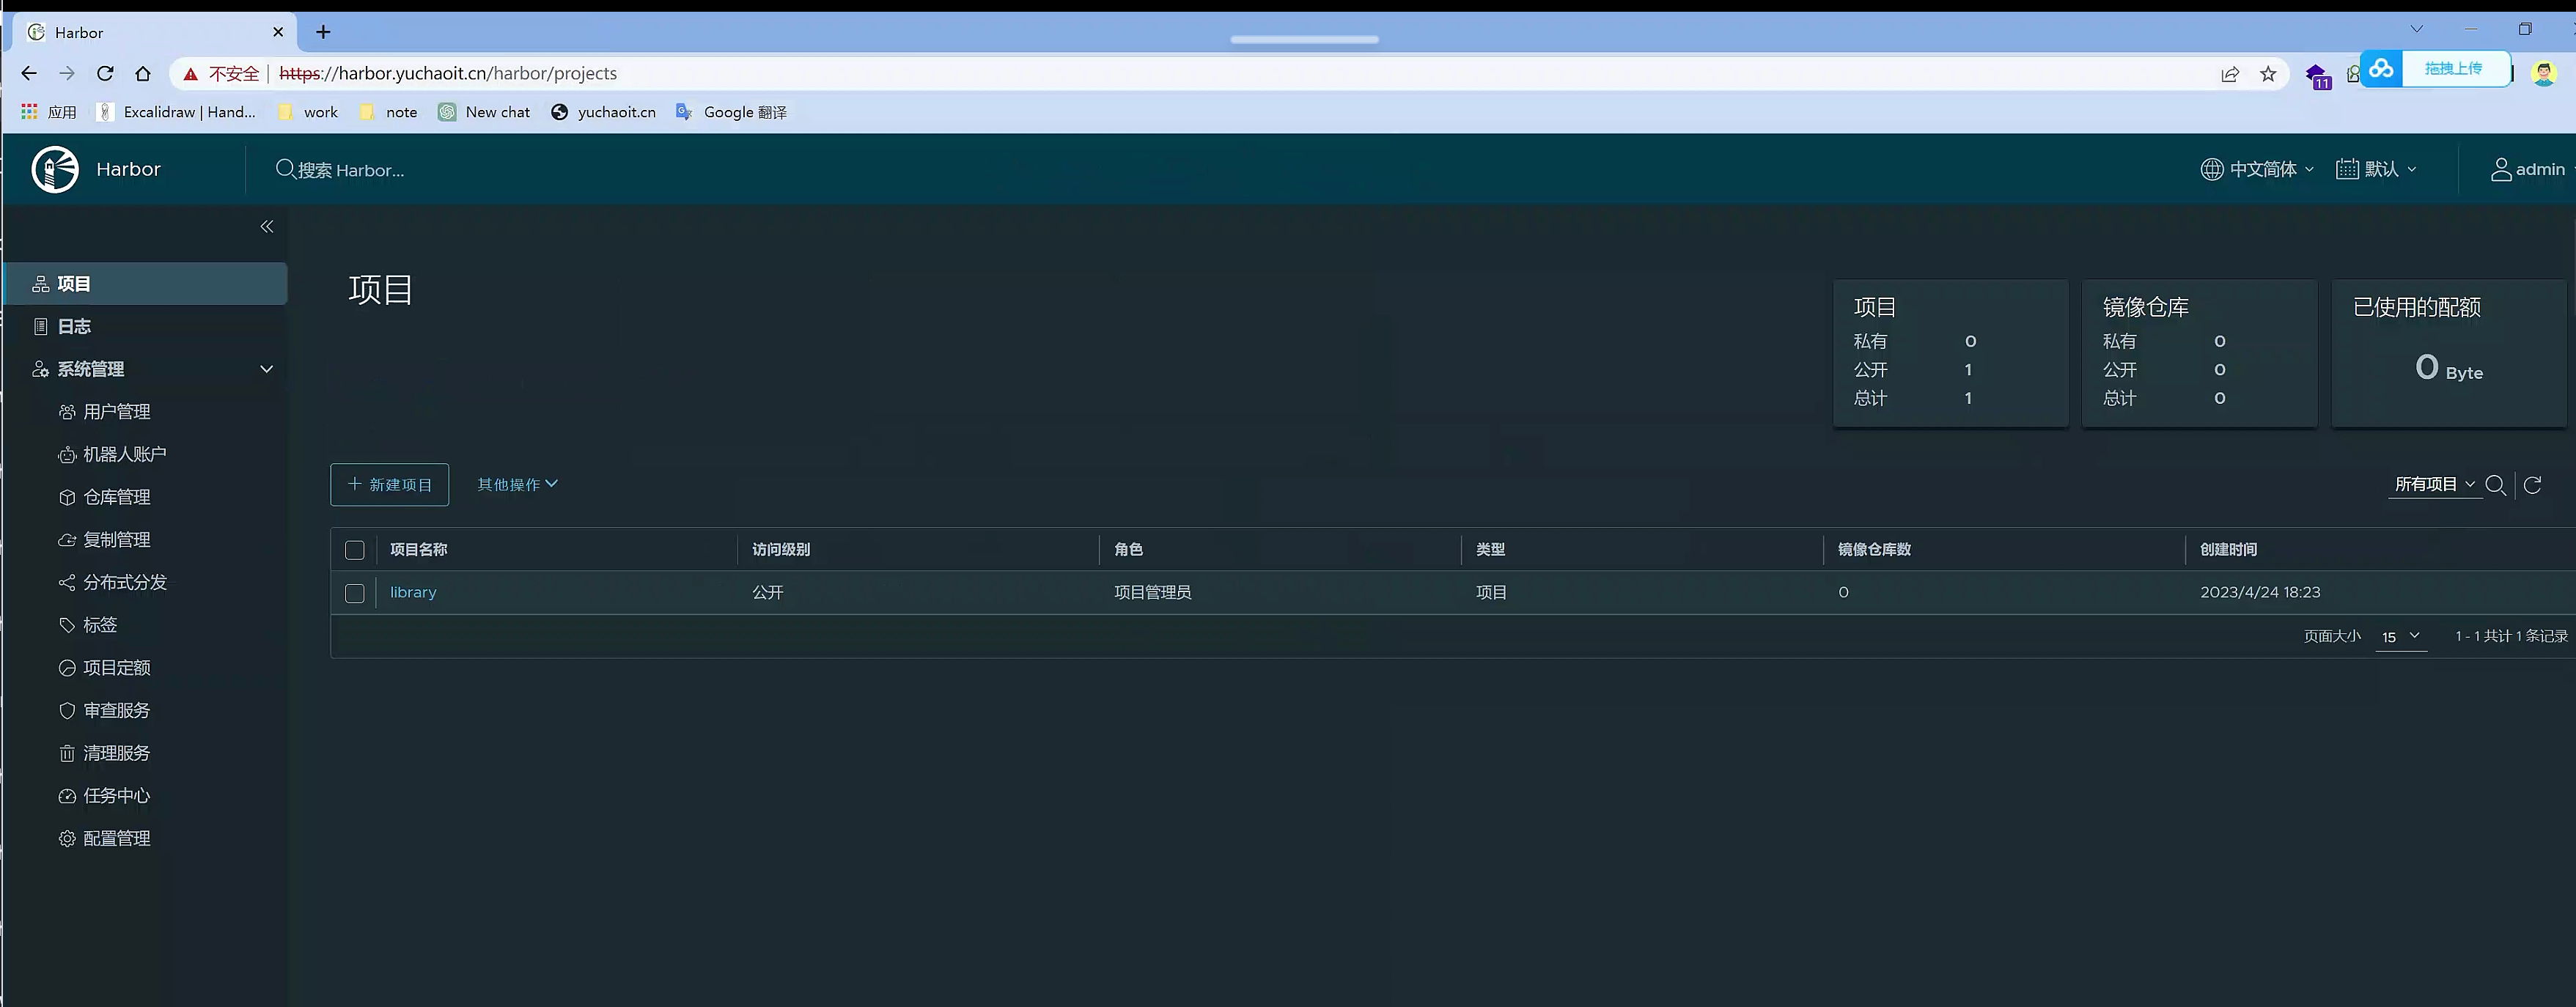
helm部署harbor
架构 https://github.com/goharbor/harbor/wiki/Architecture-Overview-of-Harbor

Harbor是一个开源的容器镜像仓库项目,提供企业级安全性和管理功能。Harbor的架构旨在为生产环境中存储和管理容器镜像提供可伸缩和可靠的解决方案。
下面是Harbor架构的高级概述:
- Web界面:Harbor提供基于Web的用户界面,允许管理员管理用户、项目和仓库。用户可以使用Web界面搜索和浏览存储在Harbor中的容器镜像。
- API:Harbor提供RESTful API,允许开发人员通过编程方式管理Harbor。API支持多种编程语言和工具,并提供对用户、项目和仓库的访问和操作。
- 认证和授权:Harbor提供用户身份验证和授权功能。管理员可以创建和管理用户帐户,并为每个用户指定不同的角色和权限。Harbor还支持LDAP和Active Directory等身份验证方案。
- 存储后端:Harbor可以使用多种存储后端,包括本地存储、Amazon S3、OpenStack Swift、Google云存储等。管理员可以选择最适合其组织的存储后端。
- 复制:Harbor支持镜像的复制和同步。管理员可以设置复制规则,使得多个Harbor实例之间可以同步镜像。这提高了镜像的可用性和可靠性。
- 安全:Harbor提供多种安全功能,包括镜像签名、漏洞扫描和访问控制等。这些功能可以帮助管理员确保存储在Harbor中的容器镜像的安全性和可信度。
总之,Harbor的架构提供了一个强大的容器镜像管理平台,具有可扩展性、可靠性和安全性等重要特性。
- Core,核心组件
- API Server,接收处理用户请求
- Config Manager :所有系统的配置,比如认证、邮件、证书配置等
- Project Manager:项目管理
- Quota Manager :配额管理
- Chart Controller:chart管理
- Replication Controller :镜像副本控制器,可以与不同类型的仓库实现镜像同步
- Distribution (docker registry)
- Docker Hub
- ...
- Scan Manager :扫描管理,引入第三方组件,进行镜像安全扫描
- Registry Driver :镜像仓库驱动,目前使用docker registry
- Job Service,执行异步任务,如同步镜像信息
- Log Collector,统一日志收集器,收集各模块日志
- GC Controller
Chart Museum,chart仓库服务,第三方,- Docker Registry,镜像仓库服务
- kv-storage,redis缓存服务,job service使用,存储job metadata
- local/remote storage,存储服务,比较镜像存储
- SQL Database,postgresl,存储用户、项目等元数据
通常用作企业级镜像仓库服务,实际功能强大很多。
组件众多,手工部署太费劲了,因此使用helm部署。
部署笔记
# 添加harbor chart仓库
$ helm repo add harbor https://helm.goharbor.io
[root@k8s-master ~/charts]#helm repo ls
NAME      URL
stable    https://charts.bitnami.com/bitnami
harbor    https://helm.goharbor.io


# 搜索harbor的chart
# 2个仓库里都有harbor
[root@k8s-master ~/charts]#helm search repo harbor
NAME             CHART VERSION    APP VERSION    DESCRIPTION
harbor/harbor    1.12.0           2.8.0          An open source trusted cloud native registry th...
stable/harbor    16.4.10          2.7.1          Harbor is an open source trusted cloud-native r...


# 不知道如何部署,因此拉到本地
# 直接安装的话,可能你还不清楚传入什么参数
[root@k8s-master ~/charts]#helm pull harbor/harbor
[root@k8s-master ~/charts]#ls
harbor-1.12.0.tgz  wordpress  wordpress-16.0.0.tgz
[root@k8s-master ~/charts]#tar -xf harbor-1.12.0.tgz
[root@k8s-master ~/charts]#ls
harbor  harbor-1.12.0.tgz  wordpress  wordpress-16.0.0.tgz
[root@k8s-master ~/charts]#cd harbor/
[root@k8s-master ~/charts/harbor]#ls
Chart.yaml  conf  LICENSE  README.md  templates  values.yaml
[root@k8s-master ~/charts/harbor]#


# 学习技巧,直接看values.yaml,理解如何启动该harbor项目
[root@k8s-master ~/charts/harbor]#vim values.yaml


# 以及修改为如下的值,需要修改ingress控制器选择
 34   ingress:
 35     hosts:
 36       core: harbor.yuchaoit.cn
 37       notary: notary.harbor.domain
 38     # set to the type of ingress controller if it has specific requirements.
 39     # leave as `default` for most ingress controllers.
 40     # set to `gce` if using the GCE ingress controller
 41     # set to `ncp` if using the NCP (NSX-T Container Plugin) ingress controller
 42     # set to `alb` if using the ALB ingress controller
 43     # set to `f5-bigip` if using the F5 BIG-IP ingress controller
 44     controller: default
 45     ## Allow .Capabilities.KubeVersion.Version to be overridden while creating ingress
 46     kubeVersionOverride: ""
 47     className: "nginx"
 48     annotations:


# 修改externalURL,web访问入口,和ingress的域名相同(126行)
126 # If Harbor is deployed behind the proxy, set it as the URL of proxy
127 externalURL: https://harbor.yuchaoit.cn
128

# 持久化,使用PVC对接的nfs,存储harbor的静态数据
单独创建一个pvc,给harbor使用NFS的存储。因此于超老师前面讲解的storageclass+NFS驱动器,你得部署好。
$ kubectl create namespace harbor
$ cat harbor-pvc.yaml
apiVersion: v1
kind: PersistentVolumeClaim
metadata:
  name: harbor-data
  namespace: harbor
spec:
  accessModes:
  - ReadWriteMany
  resources:
    requests:
      storage: 20Gi
  storageClassName: nfs

# 创建pvc
[root@k8s-master ~/charts/harbor]#kubectl create -f harbor-pvc.yml
persistentvolumeclaim/harbor-data created
[root@k8s-master ~/charts/harbor]#kubectl -n harbor get pvc
NAME          STATUS   VOLUME                                     CAPACITY   ACCESS MODES   STORAGECLASS   AGE
harbor-data   Bound    pvc-7f0865d0-f825-429f-972e-0f43a4a2ad46   20Gi       RWX            nfs            5s
修改harbor,valumes.yaml关于镜像、以及charts存放的持久化
197 persistence:
198   enabled: true
199   # Setting it to "keep" to avoid removing PVCs during a helm delete
200   # operation. Leaving it empty will delete PVCs after the chart deleted
201   # (this does not apply for PVCs that are created for internal database
202   # and redis components, i.e. they are never deleted automatically)
203   resourcePolicy: "keep"
204   persistentVolumeClaim:
205     registry:
206       # Use the existing PVC which must be created manually before bound,
207       # and specify the "subPath" if the PVC is shared with other components
208       existingClaim: "harbor-data"
209       # Specify the "storageClass" used to provision the volume. Or the default
210       # StorageClass will be used (the default).
211       # Set it to "-" to disable dynamic provisioning
212       storageClass: ""
213       subPath: "registry"
214       accessMode: ReadWriteOnce
215       size: 5Gi
216       annotations: {}
217     chartmuseum:
218       existingClaim: "harbor-data"
219       storageClass: ""
220       subPath: "chartmuseum"
221       accessMode: ReadWriteOnce
222       size: 5Gi
223       annotations: {}
224     jobservice:
225       jobLog:
226         existingClaim: ""
227         storageClass: ""
228         subPath: ""
229         accessMode: ReadWriteOnce
230         size: 1Gi
231         annotations: {}
232     # If external database is used, the following settings for database will
233     # be ignored
234     database:
235       existingClaim: "harbor-data"
236       storageClass: ""
237       subPath: "database"
238       accessMode: ReadWriteOnce
239       size: 1Gi
240       annotations: {}
241     # If external Redis is used, the following settings for Redis will
242     # be ignored
243     redis:
244       existingClaim: "harbor-data"
245       storageClass: ""
246       subPath: "redis"
247       accessMode: ReadWriteOnce
248       size: 1Gi
249       annotations: {}
管理员密码
364 # The initial password of Harbor admin. Change it from portal after launching Harbor
365 # or give an existing secret for it
366 # key in secret is given via (default to HARBOR_ADMIN_PASSWORD)
367 # existingSecretAdminPassword:
368 existingSecretAdminPasswordKey: HARBOR_ADMIN_PASSWORD
369 harborAdminPassword: "www.yuchaoit.cn"
trivy、notary漏洞扫描组件,暂不启用
613 trivy:
614   # enabled the flag to enable Trivy scanner
615   enabled: false
...
686 notary:
687   enabled: false
至此可以安装harbor了
[root@k8s-master ~/charts]#ls
harbor  harbor-1.12.0.tgz  wordpress  wordpress-16.0.0.tgz
[root@k8s-master ~/charts]#helm -n harbor install harbor ./harbor
NAME: harbor
LAST DEPLOYED: Mon Apr 24 18:20:26 2023
NAMESPACE: harbor
STATUS: deployed
REVISION: 1
TEST SUITE: None
NOTES:
Please wait for several minutes for Harbor deployment to complete.
Then you should be able to visit the Harbor portal at https://harbor.yuchaoit.cn
For more details, please visit https://github.com/goharbor/harbor
[root@k8s-master ~/charts]#
等待所有组件进入running状态
[root@k8s-master ~/charts]#kubectl -n harbor get all
NAME                                   READY   STATUS    RESTARTS            AGE
pod/harbor-core-7b9fdb79d9-8nfkv       1/1     Running   2 (<invalid> ago)   6m9s
pod/harbor-database-0                  1/1     Running   0                   6m9s
pod/harbor-jobservice-7d5b646b-g996h   1/1     Running   5 (<invalid> ago)   6m9s
pod/harbor-portal-7cf9c7f75f-r6nn9     1/1     Running   0                   6m9s
pod/harbor-redis-0                     1/1     Running   0                   6m9s
pod/harbor-registry-f5fff8b76-wqlhn    2/2     Running   0                   6m9s

NAME                        TYPE        CLUSTER-IP       EXTERNAL-IP   PORT(S)             AGE
service/harbor-core         ClusterIP   10.111.9.192     <none>        80/TCP              6m9s
service/harbor-database     ClusterIP   10.105.185.234   <none>        5432/TCP            6m9s
service/harbor-jobservice   ClusterIP   10.96.255.170    <none>        80/TCP              6m9s
service/harbor-portal       ClusterIP   10.100.82.26     <none>        80/TCP              6m9s
service/harbor-redis        ClusterIP   10.108.71.56     <none>        6379/TCP            6m9s
service/harbor-registry     ClusterIP   10.101.154.45    <none>        5000/TCP,8080/TCP   6m9s

NAME                                READY   UP-TO-DATE   AVAILABLE   AGE
deployment.apps/harbor-core         1/1     1            1           6m9s
deployment.apps/harbor-jobservice   1/1     1            1           6m9s
deployment.apps/harbor-portal       1/1     1            1           6m9s
deployment.apps/harbor-registry     1/1     1            1           6m9s

NAME                                         DESIRED   CURRENT   READY   AGE
replicaset.apps/harbor-core-7b9fdb79d9       1         1         1       6m9s
replicaset.apps/harbor-jobservice-7d5b646b   1         1         1       6m9s
replicaset.apps/harbor-portal-7cf9c7f75f     1         1         1       6m9s
replicaset.apps/harbor-registry-f5fff8b76    1         1         1       6m9s

NAME                               READY   AGE
statefulset.apps/harbor-database   1/1     6m9s
statefulset.apps/harbor-redis      1/1     6m9s
[root@k8s-master ~/charts]#
这些Pod是部署在Kubernetes集群中的Harbor容器镜像仓库应用程序的相关组件。具体而言,这些Pod包括:
- harbor-core: Harbor核心服务,提供HTTP API和UI界面等功能;
- harbor-database: Harbor应用程序的数据库服务,用于存储和管理Harbor的元数据;
- harbor-jobservice: Harbor作业服务,负责处理Harbor的异步任务;
- harbor-portal: Harbor门户服务,提供用户注册、登录、项目管理等功能;
- harbor-redis: Harbor缓存服务,用于提高应用程序的性能;
- harbor-registry: Harbor镜像仓库服务,用于存储和管理Docker镜像。根据输出,该Pod当前正在创建中。
除了上述组件的Pod之外,还有其他相关的资源对象(如Service、Ingress等),它们共同组成了Harbor应用程序在Kubernetes集群中的部署。
[root@k8s-master ~/charts]#kubectl -n harbor get ing
NAME             CLASS   HOSTS                ADDRESS   PORTS     AGE
harbor-ingress   nginx   harbor.yuchaoit.cn             80, 443   25m
部署完毕
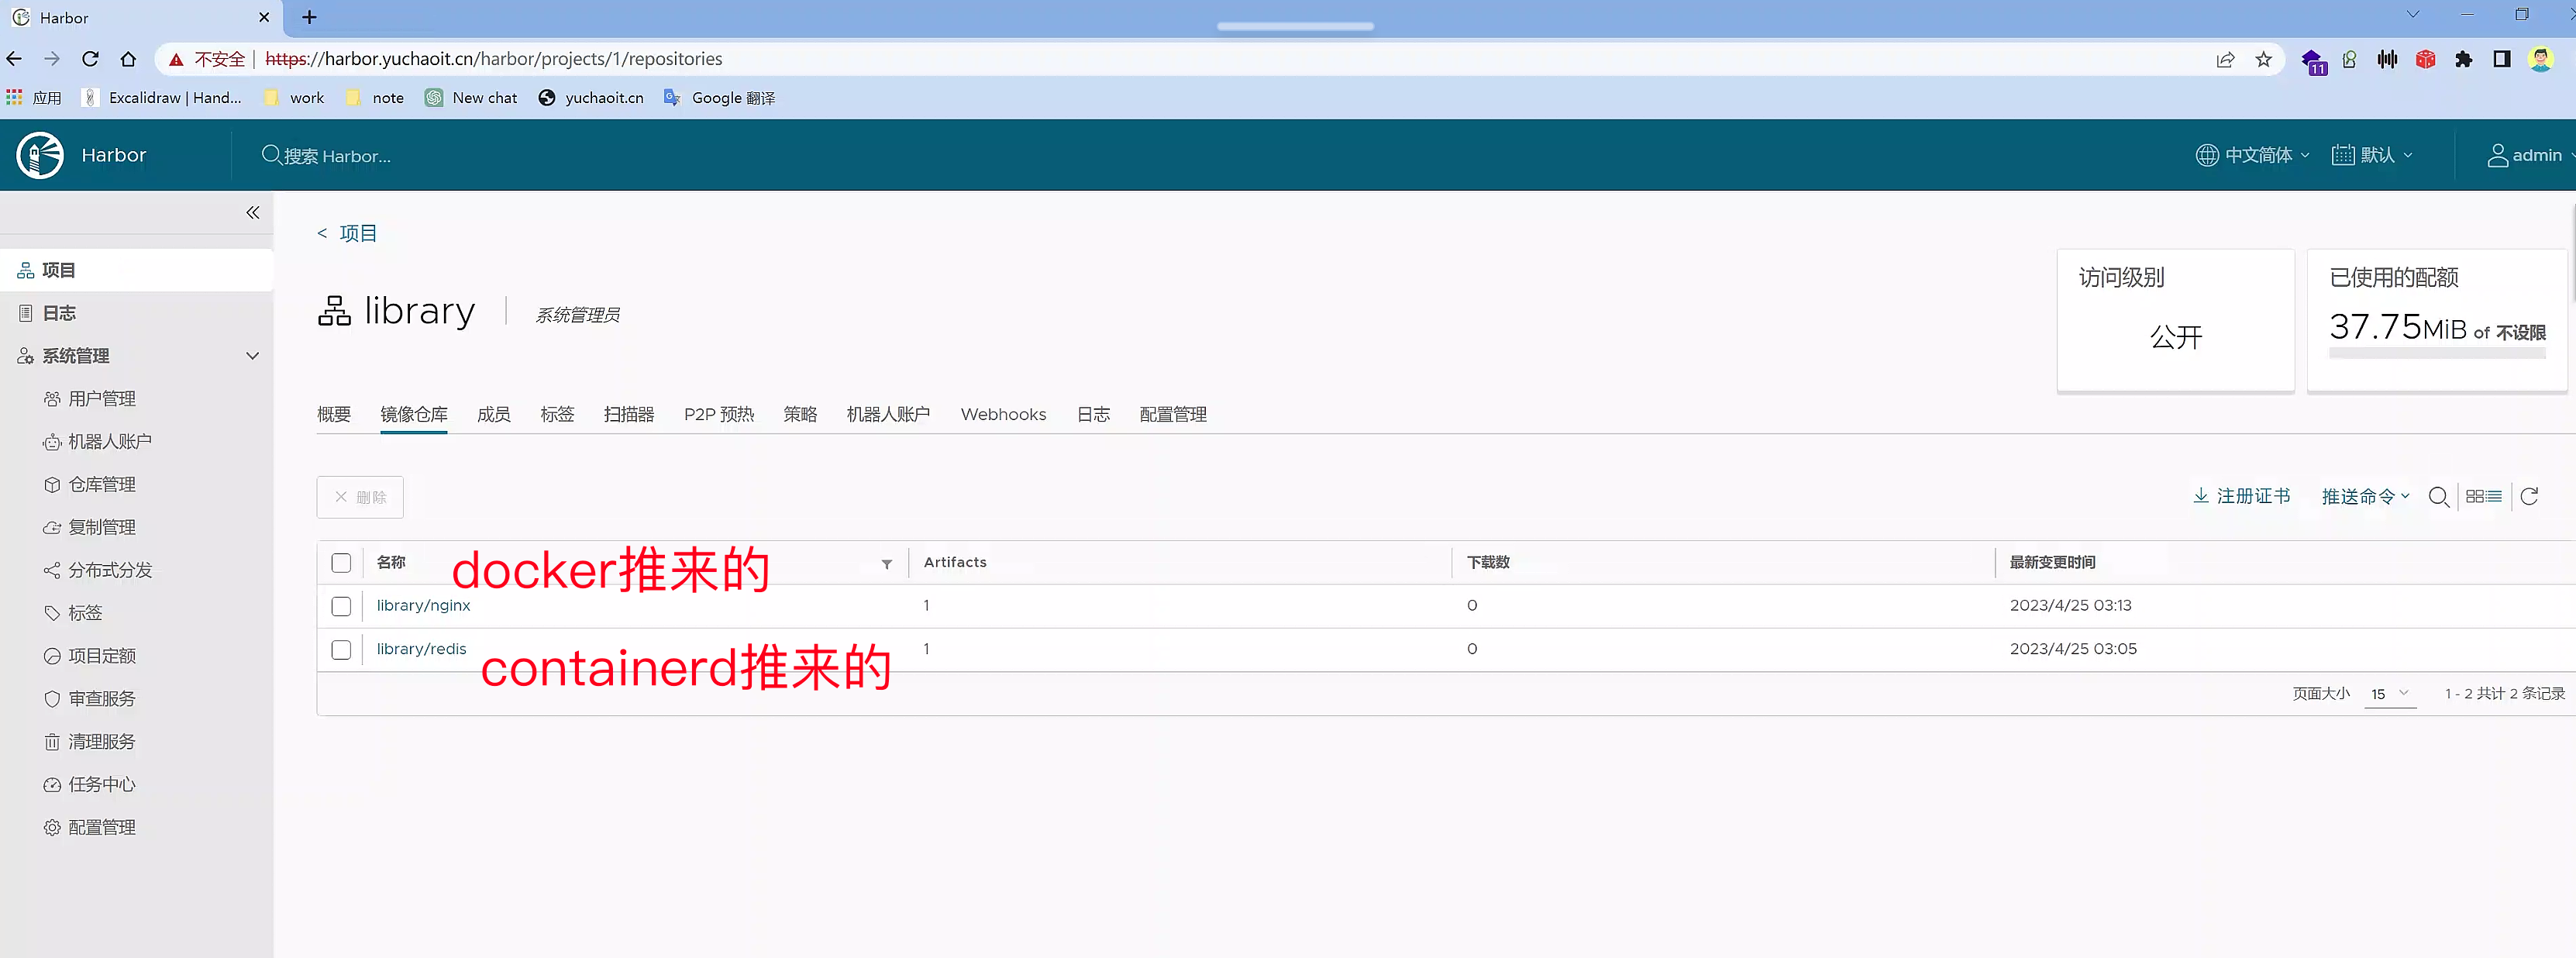
Docker推送镜像到harbor
#测试用docker推镜像到harbor里
[root@docker01 ~]#cat /etc/hosts
127.0.0.1   localhost localhost.localdomain localhost4 localhost4.localdomain4
::1         localhost localhost.localdomain localhost6 localhost6.localdomain6
10.0.0.80 harbor.yuchaoit.cn

# 修改docker配置文件
[root@docker01 ~]#cat /etc/docker/daemon.json
{
"insecure-registries":[
"harbor.yuchaoit.cn",
"10.0.0.66:5000"
],
  "registry-mirrors" : [
    "https://ms9glx6x.mirror.aliyuncs.com"
  ]
}


[root@docker01 ~]#systemctl daemon-reload

[root@docker01 ~]#systemctl restart docker

# 登录harbor  admin/www.yuchaoit.cn

[root@docker01 ~]#docker login harbor.yuchaoit.cn
Username: admin
Password:
WARNING! Your password will be stored unencrypted in /root/.docker/config.json.
Configure a credential helper to remove this warning. See
https://docs.docker.com/engine/reference/commandline/login/#credentials-store

Login Succeeded
[root@docker01 ~]#

# 修改tag推镜像
[root@docker01 ~]#docker tag redis:3.2 harbor.yuchaoit.cn/library/redis:3.2

# 推送镜像
[root@docker01 ~]#docker push harbor.yuchaoit.cn/library/redis:3.2
The push refers to repository [harbor.yuchaoit.cn/library/redis]
56431c543d6c: Pushed
bb617143299d: Pushed
cfe17e3394d7: Pushed
aa1a19279a9a: Pushed
197ffb073b01: Pushed
237472299760: Pushed
3.2: digest: sha256:562e944371527d6e11d396fe43fde17c30e28c25c23561b2322db3905cbc71dd size: 1571
[root@docker01 ~]#

containerd推送镜像到harbor
#1.创建配置目录
[root@k8s-slave1 ~]#mkdir -p /etc/containerd/certs.d/harbor.yuchaoit.cn
[root@k8s-slave1 ~]#vim /etc/containerd/certs.d/harbor.yuchaoit.cn/hosts.toml
[root@k8s-slave1 ~]#
[root@k8s-slave1 ~]#cat /etc/containerd/certs.d/harbor.yuchaoit.cn/hosts.toml
server = "https://harbor.yuchaoit.cn"
[host."https://harbor.yuchaoit.cn"]
  capabilities = ["pull", "resolve", "push"]
  skip_verify = true
[root@k8s-slave1 ~]#

# 推送镜像试试
[root@k8s-slave1 ~]#nerdctl -n k8s.io images
REPOSITORY                                            TAG        IMAGE ID        CREATED           PLATFORM       SIZE         BLOB SIZE
10.0.0.66:5000/eladmin/eladmin-web                    v5         b30633e55ba8    3 weeks ago       linux/amd64    32.0 MiB     13.0 MiB
flannel/flannel-cni-plugin                            v1.1.2     bf4b62b13166    6 weeks ago       linux/amd64    7.9 MiB      3.7 MiB
flannel/flannel                                       v0.21.3    2947963f52c2    6 weeks ago       linux/amd64    63.0 MiB     23.1 MiB
goharbor/harbor-core                                  v2.8.0     b3fe6558387f    50 minutes ago    linux/amd64    161.6 MiB    53.5 MiB
nginx                                                 alpine     eb05700fe7ba    6 weeks ago       linux/amd64    25.2 MiB     9.7 MiB
registry.aliyuncs.com/google_containers/kube-proxy    v1.24.4    64a04a34b31f    6 weeks ago       linux/amd64    110.1 MiB    37.7 MiB
registry.aliyuncs.com/google_containers/pause         3.6        3d380ca88645    6 weeks ago       linux/amd64    668.0 KiB    294.7 KiB
[root@k8s-slave1 ~]#
[root@k8s-slave1 ~]#
[root@k8s-slave1 ~]#nerdctl -n k8s.io tag nginx:alpine harbor.yuchaoit.cn/library/nginx:alpine
[root@k8s-slave1 ~]#
[root@k8s-slave1 ~]#nerdctl -n k8s.io images
REPOSITORY                                            TAG        IMAGE ID        CREATED           PLATFORM       SIZE         BLOB SIZE
10.0.0.66:5000/eladmin/eladmin-web                    v5         b30633e55ba8    3 weeks ago       linux/amd64    32.0 MiB     13.0 MiB
flannel/flannel-cni-plugin                            v1.1.2     bf4b62b13166    6 weeks ago       linux/amd64    7.9 MiB      3.7 MiB
flannel/flannel                                       v0.21.3    2947963f52c2    6 weeks ago       linux/amd64    63.0 MiB     23.1 MiB
goharbor/harbor-core                                  v2.8.0     b3fe6558387f    50 minutes ago    linux/amd64    161.6 MiB    53.5 MiB
nginx                                                 alpine     eb05700fe7ba    6 weeks ago       linux/amd64    25.2 MiB     9.7 MiB
harbor.yuchaoit.cn/library/nginx                      alpine     eb05700fe7ba    1 second ago      linux/amd64    25.2 MiB     9.7 MiB
registry.aliyuncs.com/google_containers/kube-proxy    v1.24.4    64a04a34b31f    6 weeks ago       linux/amd64    110.1 MiB    37.7 MiB
registry.aliyuncs.com/google_containers/pause         3.6        3d380ca88645    6 weeks ago       linux/amd64    668.0 KiB    294.7 KiB
[root@k8s-slave1 ~]#


# containerd登录harbor
[root@k8s-slave1 ~]#nerdctl login https://harbor.yuchaoit.cn
Enter Username: admin
Enter Password:
WARNING: Your password will be stored unencrypted in /root/.docker/config.json.
Configure a credential helper to remove this warning. See
https://docs.docker.com/engine/reference/commandline/login/#credentials-store

Login Succeeded


# 推送镜像到harbor
[root@k8s-slave1 ~]#nerdctl -n k8s.io push harbor.yuchaoit.cn/library/nginx:alpine
INFO[0000] pushing as a reduced-platform image (application/vnd.docker.distribution.manifest.list.v2+json, sha256:4a2566bc65b7e51c0b9b65690dd4dba3877e776d780fcb9043bd83c02f08c126)
index-sha256:4a2566bc65b7e51c0b9b65690dd4dba3877e776d780fcb9043bd83c02f08c126:    done           |++++++++++++++++++++++++++++++++++++++|
manifest-sha256:544ba2bfe312bf2b13278495347bb9381ec342e630bcc8929af124f1291784bb: done           |++++++++++++++++++++++++++++++++++++++|
config-sha256:cc44224bfe208a46fbc45471e8f9416f66b75d6307573e29634e7f42e27a9268:   done           |++++++++++++++++++++++++++++++++++++++|
elapsed: 1.2 s                                                                    total:  10.5 K (8.8 KiB/s)
[root@k8s-slave1 ~]#
k8s-master使用harbor镜像
[root@k8s-master ~/charts]#mkdir -p /etc/containerd/certs.d/harbor.yuchaoit.cn
[root@k8s-master ~/charts]#vim /etc/containerd/certs.d/harbor.yuchaoit.cn/hosts.toml
[root@k8s-master ~/charts]#nerdctl login https://harbor.yuchaoit.cn
Enter Username: admin
Enter Password:
WARNING: Your password will be stored unencrypted in /root/.docker/config.json.
Configure a credential helper to remove this warning. See
https://docs.docker.com/engine/reference/commandline/login/#credentials-store

Login Succeeded

# 创建pod,使用harbor镜像
kubectl create deployment ngx-t2 --image=harbor.yuchaoit.cn/library/nginx@sha256:4a2566bc65b7e51c0b9b65690dd4dba3877e776d780fcb9043bd83c02f08c126
# 或者
kubectl create deployment ngx-t3 --image=harbor.yuchaoit.cn/library/nginx:alpine


# 还有更专业的用法,创建secret,作为镜像拉取凭证
[root@k8s-master ~/charts]#cat /etc/hosts
127.0.0.1   localhost localhost.localdomain localhost4 localhost4.localdomain4
::1         localhost localhost.localdomain localhost6 localhost6.localdomain6
10.0.0.80 k8s-master eladmin-api.yuchao.com eladmin.yuchao.com harbor.yuchaoit.cn
10.0.0.81 k8s-slave1
10.0.0.82 k8s-slave2


[root@k8s-master ~/charts]#kubectl -n default create secret docker-registry harbor  --docker-username=admin --docker-password=www.yuchaoit.cn --docker-email=yc_uuu@163.com --docker-server=harbor.yuchaoit.cn
secret/harbor created
写yaml,使用harbor镜像+secret
[root@k8s-master ~/k8s-all]#cat harbor-nginx.yaml
---
apiVersion: apps/v1
kind: Deployment
metadata:
  name: test-harbor-pod
  namespace: yuchao
spec:
  replicas: 1   #指定Pod副本数
  selector:             #指定Pod的选择器
    matchLabels:
      app: test-harbor-pod
  template:
    metadata:
      labels:   #给Pod打label
        app: test-harbor-pod
    spec:
      imagePullSecrets:
      - name: harbor
      containers:
      - name: test-harbor-nginx
        image: harbor.yuchaoit.cn/library/nginx:alpine
        imagePullPolicy: IfNotPresent
        ports:
        - containerPort: 80
大功告成
[root@k8s-master ~/k8s-all]#kubectl apply -f harbor-nginx.yaml

[root@k8s-master ~/k8s-all]#kubectl -n yuchao get po |grep harbor
test-harbor-pod-7dffd58fb5-vzbwg   1/1     Running   0                53s
查看nfs
[root@docker01 /data/k8s]#ll
total 4
drwxrwxrwx 5 root    root   51 Apr 24 18:24 harbor-harbor-data-pvc-7f0865d0-f825-429f-972e-0f43a4a2ad46
drwxrwxrwx 2 root    root   89 Apr 24 19:00 harbor-harbor-jobservice-pvc-a29a1209-62bd-4888-bff6-e9883cb9c7d7
drwxr-xr-x 2 root    root   24 Apr 21 17:47 yc-nginx
drwxrwxrwx 6 polkitd root 4096 Apr 23 11:51 yuchao-auto-pvc-mysql-pvc-ae643077-64ca-49d3-85a4-68750cb4cb4b
drwxrwxrwx 2 root    root   24 Apr 23 11:25 yuchao-test-pvc-pvc-cc925348-84eb-4469-8cba-60018e1244e2
[root@docker01 /data/k8s]#du -sh *
102M    harbor-harbor-data-pvc-7f0865d0-f825-429f-972e-0f43a4a2ad46
8.0K    harbor-harbor-jobservice-pvc-a29a1209-62bd-4888-bff6-e9883cb9c7d7
4.0K    yc-nginx
220M    yuchao-auto-pvc-mysql-pvc-ae643077-64ca-49d3-85a4-68750cb4cb4b
4.0K    yuchao-test-pvc-pvc-cc925348-84eb-4469-8cba-60018e1244e2


[root@docker01 /data/k8s]#cd harbor-harbor-data-pvc-7f0865d0-f825-429f-972e-0f43a4a2ad46/


[root@docker01 /data/k8s/harbor-harbor-data-pvc-7f0865d0-f825-429f-972e-0f43a4a2ad46]#ll
total 0
drwxrwxrwx 3 root root 20 Apr 24 18:22 database
drwxrwxrwx 2 root root 22 Apr 24 19:23 redis
drwxrwxrwx 3 root root 20 Apr 24 19:05 registry
[root@docker01 /data/k8s/harbor-harbor-data-pvc-7f0865d0-f825-429f-972e-0f43a4a2ad46]#du -sh *
64M    database
72K    redis
38M    registry
推送本地chart到harbor(略过)
最新测试harbor 2.8版本,无法演示
Helm-push插件
helm3默认没有安装helm push插件,需要手动安装。插件地址 https://github.com/chartmuseum/helm-push
# 在线安装,网络问题
[root@k8s-master ~]#helm plugin install https://github.com/chartmuseum/helm-push

# 离线装
$ mkdir helm-push
$ wget https://github.com/chartmuseum/helm-push/releases/download/v0.8.1/helm-push_0.8.1_linux_amd64.tar.gz
$ tar zxf helm-push_0.8.1_linux_amd64.tar.gz -C helm-push
$ helm plugin install ./helm-push

# 添加证书信任,根证书为配置给ingress使用的证书
$ kubectl get secret harbor-ingress -n harbor -o jsonpath="{.data.ca\.crt}" | base64 -d >harbor.ca.crt

# 这些命令用于将根证书颁发机构(CA)证书安装到Linux系统的受信任证书存储中。具体而言,该命令将一个名为"harbor.ca.crt"的CA证书复制到"/etc/pki/ca-trust/source/anchors"目录下,然后使用"update-ca-trust enable"命令启用更新证书信任机制,最后使用"update-ca-trust extract"命令从所有可用的证书中提取并安装证书。

#这将确保Linux系统信任由该CA颁发的所有证书。本机信任证书
$ cp harbor.ca.crt /etc/pki/ca-trust/source/anchors
$ update-ca-trust enable; update-ca-trust extract


# 再次添加chart仓库
$ helm repo add yuchao https://harbor.yuchaoit.cn/chartrepo/yuchao --ca-file=harbor.ca.crt  --username admin --password www.yuchaoit.cn

$ helm repo ls

$ helm push harbor yuchao --ca-file=harbor.ca.crt -u admin -p www.yuchaoit.cn
基于nginx的chart学习
这部分可能需要学习一点go语言编程语法,理解 Go 语言的 text/template 和 sprig 库,才能更容易理解
新人可跳过。
helm安装nginx
[root@k8s-master ~/charts]#helm create nginx
Creating nginx
[root@k8s-master ~/charts]#ls
harbor  harbor-1.12.0.tgz  nginx  wordpress  wordpress-16.0.0.tgz
[root@k8s-master ~/charts]#ls nginx/
charts  Chart.yaml  templates  values.yaml

[root@k8s-master ~/charts]#kubectl create namespace demo-nginx
namespace/demo-nginx created
[root@k8s-master ~/charts]#
[root@k8s-master ~/charts]#
[root@k8s-master ~/charts]#helm -n demo-nginx install nginx ./nginx --set replicaCount=2 --set image.tag=alpine
NAME: nginx
LAST DEPLOYED: Tue Apr 25 09:53:53 2023
NAMESPACE: demo-nginx
STATUS: deployed
REVISION: 1
NOTES:
1. Get the application URL by running these commands:
  export POD_NAME=$(kubectl get pods --namespace demo-nginx -l "app.kubernetes.io/name=nginx,app.kubernetes.io/instance=nginx" -o jsonpath="{.items[0].metadata.name}")
  echo "Visit http://127.0.0.1:8080 to use your application"
  kubectl --namespace demo-nginx port-forward $POD_NAME 8080:80
[root@k8s-master ~/charts]#


[root@k8s-master ~/charts]#helm -n demo-nginx ls
NAME     NAMESPACE     REVISION    UPDATED                                    STATUS      CHART          APP VERSION
nginx    demo-nginx    1           2023-04-25 09:53:53.120337832 +0800 CST    deployed    nginx-0.1.0    1.16.0

[root@k8s-master ~/charts]#kubectl -n demo-nginx get po
NAME                     READY   STATUS    RESTARTS   AGE
nginx-7dd78f9597-bdrx6   1/1     Running   0          37s
nginx-7dd78f9597-c8dj4   1/1     Running   0          37s

[root@k8s-master ~/charts]#curl 10.244.0.103 -I
HTTP/1.1 200 OK
Server: nginx/1.23.4
Date: Tue, 25 Apr 2023 01:54:48 GMT
Content-Type: text/html
Content-Length: 615
Last-Modified: Tue, 28 Mar 2023 17:09:24 GMT
Connection: keep-alive
ETag: "64231f44-267"
Accept-Ranges: bytes
chart语法学习
$ tree nginx/
nginx/
├── charts                        # 存放子chart
├── Chart.yaml                    # 该chart的全局定义信息
├── templates                    # chart运行所需的资源清单模板,用于和values做渲染
│   ├── deployment.yaml
│   ├── _helpers.tpl            # 定义全局的命名模板,方便在其他模板中引入使用
│   ├── hpa.yaml
│   ├── ingress.yaml
│   ├── NOTES.txt                # helm安装完成后终端的提示信息
│   ├── serviceaccount.yaml
│   ├── service.yaml
│   └── tests
│       └── test-connection.yaml
└── values.yaml                    # 模板使用的默认值信息
很明显,资源清单都在templates中,数据来源于values.yaml,安装的过程就是将模板与数据融合成k8s可识别的资源清单,然后部署到k8s环境中。
用如下命令查看helm的安装调试过程,理解发生了什么
--dry-run获取最终yaml
$ helm install debug-nginx ./nginx --dry-run --set replicaCount=2 --debug
[root@k8s-master ~/charts]#helm install debug-nginx ./nginx --dry-run --set replicaCount=2 --debug
install.go:159: [debug] Original chart version: ""
install.go:176: [debug] CHART PATH: /root/charts/nginx

NAME: debug-nginx
LAST DEPLOYED: Tue Apr 25 10:01:25 2023
NAMESPACE: default
STATUS: pending-install
REVISION: 1
USER-SUPPLIED VALUES:
replicaCount: 2

COMPUTED VALUES:
affinity: {}
autoscaling:
  enabled: false
  maxReplicas: 100
  minReplicas: 1
  targetCPUUtilizationPercentage: 80
fullnameOverride: ""
image:
  pullPolicy: IfNotPresent
  repository: nginx
  tag: ""
imagePullSecrets: []
ingress:
  annotations: {}
  enabled: false
  hosts:
  - host: chart-example.local
    paths: []
  tls: []
nameOverride: ""
nodeSelector: {}
podAnnotations: {}
podSecurityContext: {}
replicaCount: 2
resources: {}
securityContext: {}
service:
  port: 80
  type: ClusterIP
serviceAccount:
  annotations: {}
  create: true
  name: ""
tolerations: []

HOOKS:
---
# Source: nginx/templates/tests/test-connection.yaml
apiVersion: v1
kind: Pod
metadata:
  name: "debug-nginx-test-connection"
  labels:
    helm.sh/chart: nginx-0.1.0
    app.kubernetes.io/name: nginx
    app.kubernetes.io/instance: debug-nginx
    app.kubernetes.io/version: "1.16.0"
    app.kubernetes.io/managed-by: Helm
  annotations:
    "helm.sh/hook": test-success
spec:
  containers:
    - name: wget
      image: busybox
      command: ['wget']
      args: ['debug-nginx:80']
  restartPolicy: Never
MANIFEST:
---
# Source: nginx/templates/serviceaccount.yaml
apiVersion: v1
kind: ServiceAccount
metadata:
  name: debug-nginx
  labels:
    helm.sh/chart: nginx-0.1.0
    app.kubernetes.io/name: nginx
    app.kubernetes.io/instance: debug-nginx
    app.kubernetes.io/version: "1.16.0"
    app.kubernetes.io/managed-by: Helm
---
# Source: nginx/templates/service.yaml
apiVersion: v1
kind: Service
metadata:
  name: debug-nginx
  labels:
    helm.sh/chart: nginx-0.1.0
    app.kubernetes.io/name: nginx
    app.kubernetes.io/instance: debug-nginx
    app.kubernetes.io/version: "1.16.0"
    app.kubernetes.io/managed-by: Helm
spec:
  type: ClusterIP
  ports:
    - port: 80
      targetPort: http
      protocol: TCP
      name: http
  selector:
    app.kubernetes.io/name: nginx
    app.kubernetes.io/instance: debug-nginx
---
# Source: nginx/templates/deployment.yaml
apiVersion: apps/v1
kind: Deployment
metadata:
  name: debug-nginx
  labels:
    helm.sh/chart: nginx-0.1.0
    app.kubernetes.io/name: nginx
    app.kubernetes.io/instance: debug-nginx
    app.kubernetes.io/version: "1.16.0"
    app.kubernetes.io/managed-by: Helm
spec:
  replicas: 2
  selector:
    matchLabels:
      app.kubernetes.io/name: nginx
      app.kubernetes.io/instance: debug-nginx
  template:
    metadata:
      labels:
        app.kubernetes.io/name: nginx
        app.kubernetes.io/instance: debug-nginx
    spec:
      serviceAccountName: debug-nginx
      securityContext:
        {}
      containers:
        - name: nginx
          securityContext:
            {}
          image: "nginx:1.16.0"
          imagePullPolicy: IfNotPresent
          ports:
            - name: http
              containerPort: 80
              protocol: TCP
          livenessProbe:
            httpGet:
              path: /
              port: http
          readinessProbe:
            httpGet:
              path: /
              port: http
          resources:
            {}

NOTES:
1. Get the application URL by running these commands:
  export POD_NAME=$(kubectl get pods --namespace default -l "app.kubernetes.io/name=nginx,app.kubernetes.io/instance=debug-nginx" -o jsonpath="{.items[0].metadata.name}")
  echo "Visit http://127.0.0.1:8080 to use your application"
  kubectl --namespace default port-forward $POD_NAME 8080:80
[root@k8s-master ~/charts]#
分析template语法
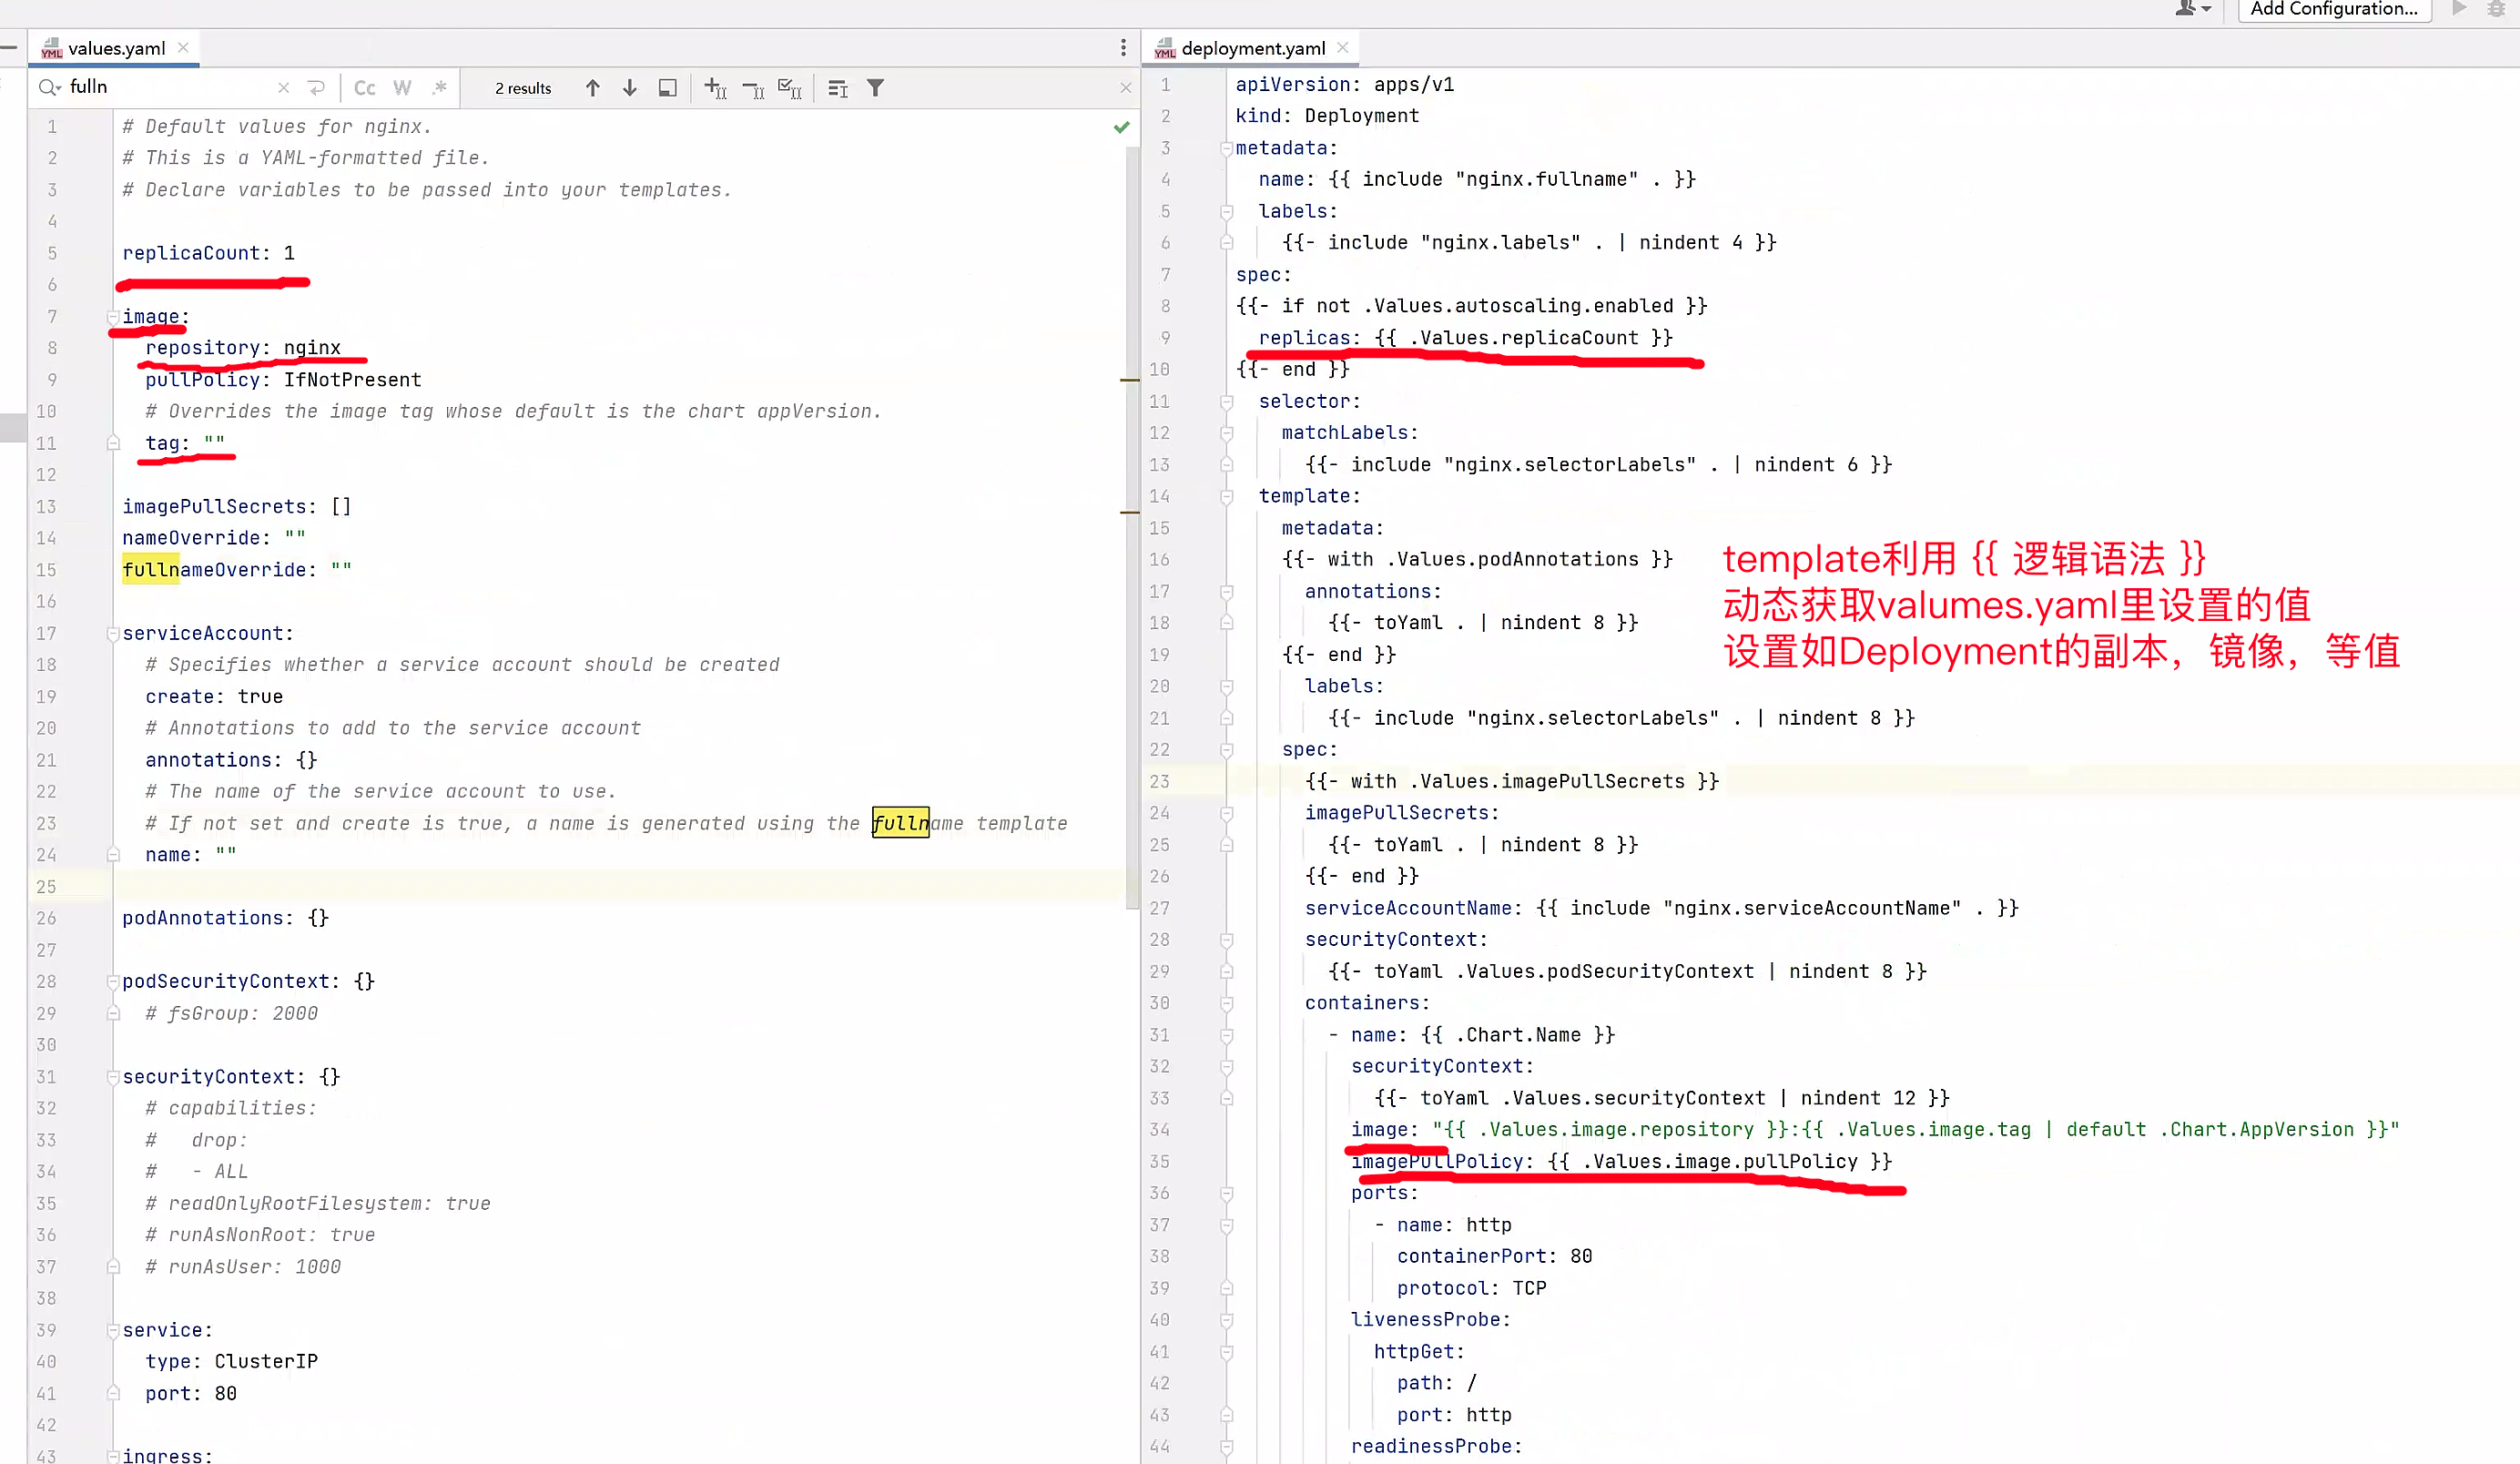
# helm -n demo-nginx install nginx ./nginx --set replicaCount=2 --set image.tag=alpine

当我们传入--set  replicaCount=2的参数后,是修改valumes.yaml

# valumes.yaml
# Default values for nginx.
# This is a YAML-formatted file.
# Declare variables to be passed into your templates.

replicaCount: 1

image:
  repository: nginx
  pullPolicy: IfNotPresent
  # Overrides the image tag whose default is the chart appVersion.
  tag: ""
当你修改了valumes.yaml又是如何传递给template,以及最终和nginx相关的资源yaml结合。
deloyment.yaml名字从何而来

nginx镜像名、副本如何定义
例如hpt.yaml为什么没安装
[root@k8s-master ~/charts]#kubectl -n demo-nginx get hpa
No resources found in demo-nginx namespace.
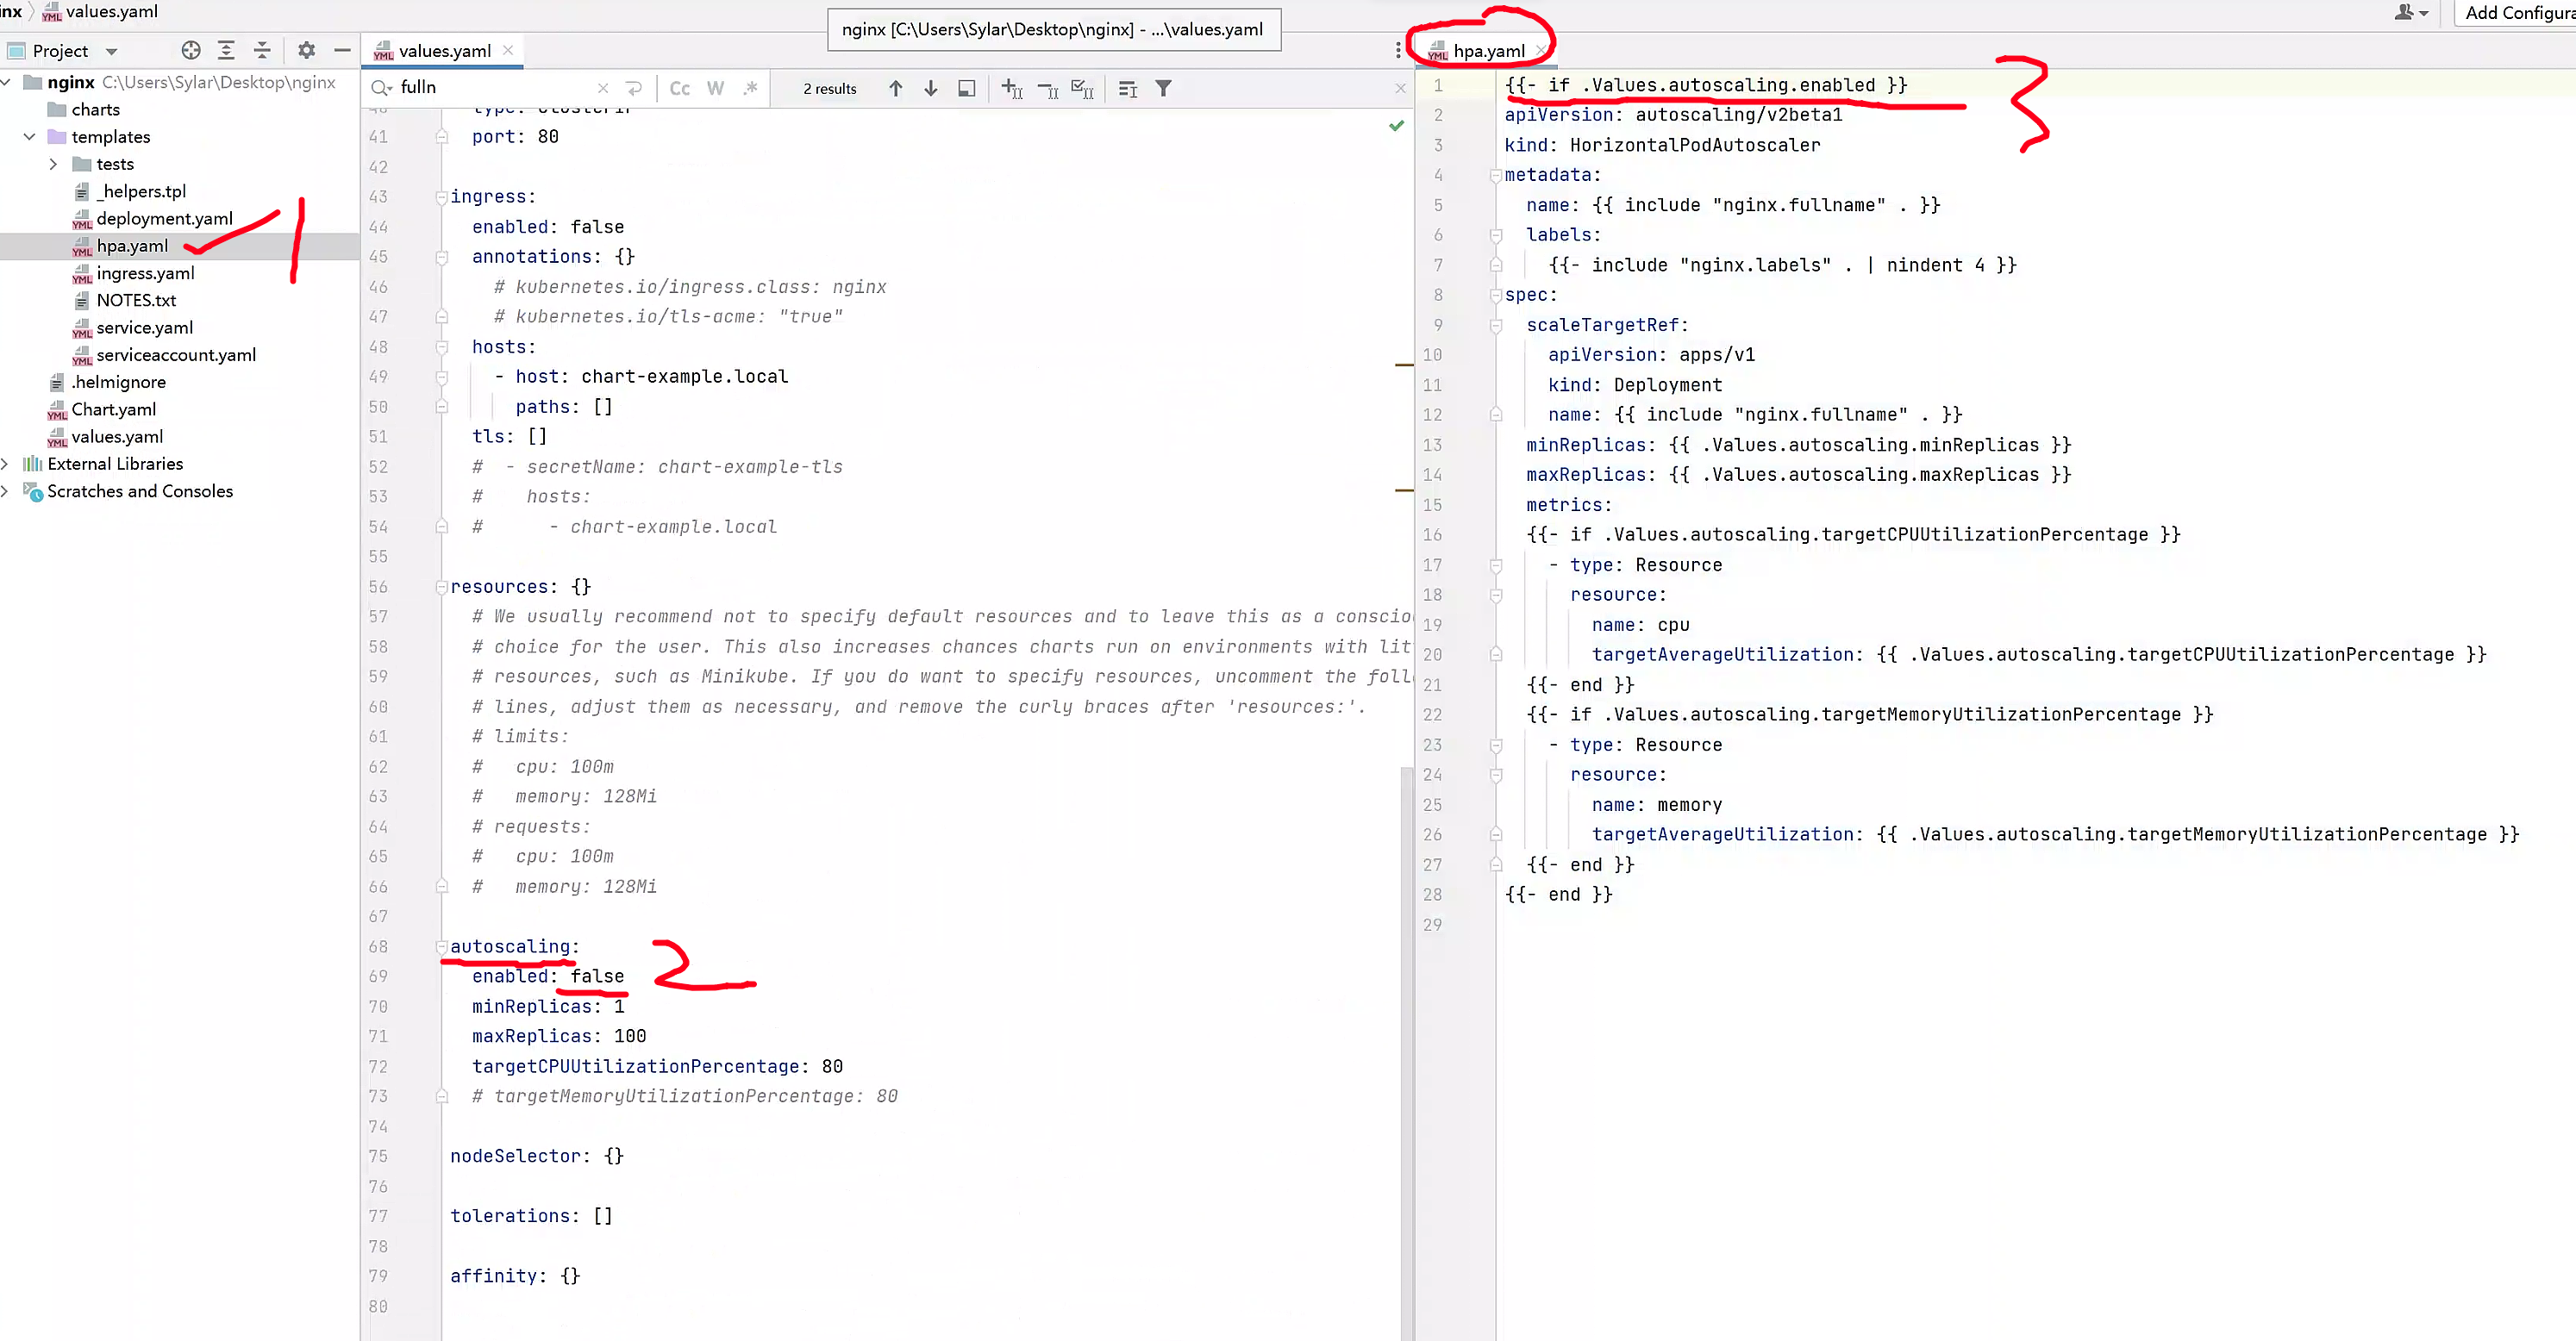
# 开启nginx的hpa功能
helm -n demo-nginx install nginx-hpa ./nginx --set replicaCount=2 --set image.tag=alpine --set autoscaling.enabled=true

[root@k8s-master ~/charts]#helm -n demo-nginx ls
NAME         NAMESPACE     REVISION    UPDATED                                    STATUS      CHART          APP VERSION
nginx        demo-nginx    1           2023-04-25 09:53:53.120337832 +0800 CST    deployed    nginx-0.1.0    1.16.0
nginx-hpa    demo-nginx    1           2023-04-25 10:35:32.980201508 +0800 CST    deployed    nginx-0.1.0    1.16.0


[root@k8s-master ~/charts]#kubectl -n demo-nginx get hpa
NAME        REFERENCE              TARGETS         MINPODS   MAXPODS   REPLICAS   AGE
nginx-hpa   Deployment/nginx-hpa   <unknown>/80%   1         100       1          111s

# 扩容最大pod给到了100,这也太慷慨了
小结
所以chart就是values.yaml结合template.yaml完成的k8s资源创建。
并且遵循yaml语法,以及go语言template的一些逻辑判断,字符、变量处理,如管道,字符截取,去掉后缀,循环遍历、default设置默认值等。
未学过python、golang的template模板开发语言,暂时不用了解了。